Home Network Security: Lock It Down Without Losing Your Weekend
If the internet is the highway, your home network is your driveway. You wouldn’t leave your garage open with a neon sign that says “steal me,” right? Same deal here. Let’s tighten things up—fast, simple, and real-world—so your family’s stuff stays your family’s stuff.

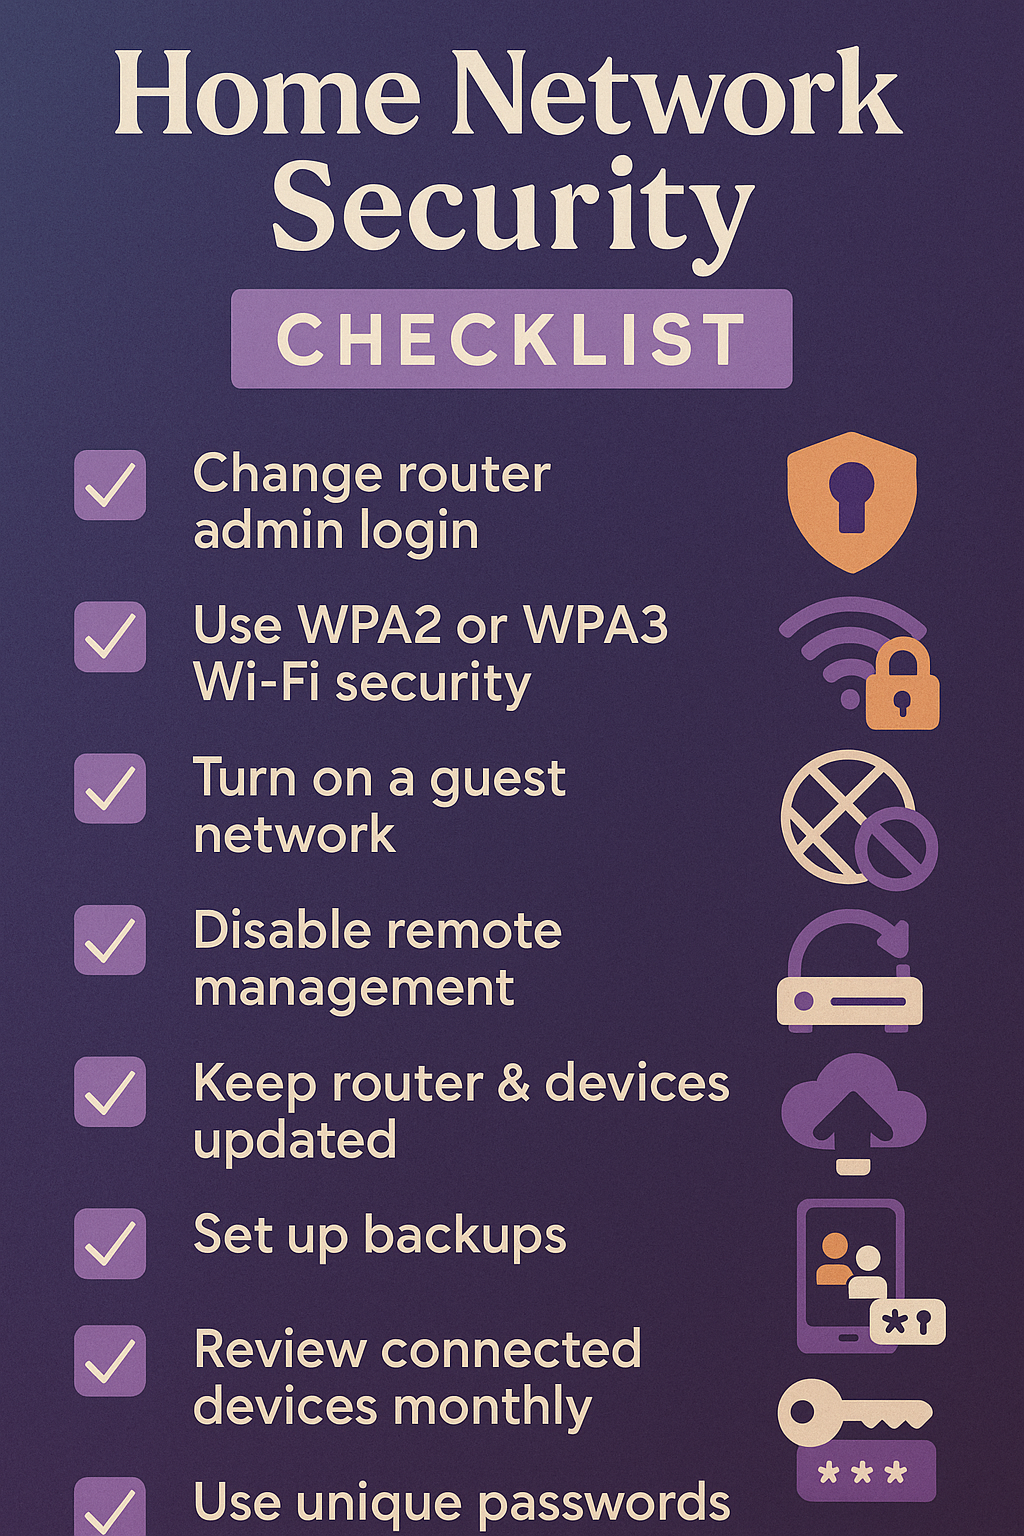
✅ Home Network Security Quick Checklist
- 🔒 Change your router admin login (no more “admin/admin”)
- 📶 Use WPA2-AES or WPA3 Wi-Fi security (WPS OFF)
- 👥 Turn on a guest network for visitors & smart gadgets
- 🛑 Disable remote management + UPnP (unless you really need it)
- 🔄 Keep router & devices updated (auto-update ON where possible)
- 💾 Set up backups (local + cloud, test a restore once)
- 👀 Review connected devices monthly & kick out strangers
- 🔑 Use unique passwords + 2FA for important accounts
The 10-Minute Lockdown (Start Here)
- Change the router’s admin login – No more “admin/admin.” Use a long, unique password and tuck it into a password manager.
- Turn on WPA2/WPA3 – Strong Wi-Fi encryption only. Ditch WEP forever.
- Auto-update everything – Phones, laptops, smart TVs, routers. Updates fix holes hackers already know about.
- Guest network = yes – Let friends and neighbors surf there, not on your main Wi-Fi.
- Kill remote management – If you don’t need it, shut it off. Use a VPN instead if you want remote access.
👉 With just those five moves, you’ve slammed the door on 80% of the junk that could hurt your network. Think of it as locking the front door and closing the windows before you leave the house. Doesn’t take long, but it keeps a whole lot of trouble outside.
The Smart Defaults (Set Once, Forget It)
- Rename your Wi-Fi to something neutral, not “JonesFamilyWiFi.”
- Put your router in the open, not stuffed in a closet.
- Give every device its own password (don’t reuse Netflix123 everywhere).
- Kick unknown devices off when you see them.
- Keep regular backups of important files.
👉 These defaults aren’t glamorous, but they’re like brushing your teeth—skip them long enough and you’ll regret it. The beauty is you only set them once, and your network quietly keeps humming along with less drama.

Good Security Habits (Monthly, 15 minutes)
- Update firmware on your router and smart gadgets.
- Review the list of connected devices.
- Run a malware scan.
- Reboot the router after updates.
- Double-check parental or content filters if you use them.
👉 Doing a 15-minute “digital tune-up” each month is way easier than dealing with an identity theft nightmare later. It’s like checking the oil in your car: a little bit of maintenance saves you from a costly breakdown.
Optional Power-Ups (Pro Level)
- Wire in your most important devices (PCs, consoles, TVs).
- Put smart home gadgets on their own network.
- Use DNS filtering to block sketchy sites.
- Leave the router firewall on; turn UPnP off unless you need it briefly.
- Use a VPN if you want secure access to your home from the road.
👉 None of these are “musts” for the average family, but they’re solid upgrades if you like having extra control. Think of them as adding deadbolts, motion lights, and a security cam to a house that’s already locked up. Not required, but peace of mind for folks who want it.
Step-by-Step: Secure Wi-Fi Settings (Router-Agnostic)
Log in to the router (usually 192.168.0.1 or 192.168.1.1).
- Change admin login and disable remote management.
- Set Wi-Fi security to WPA2-AES or WPA3.
- Create a strong Wi-Fi password.
- Disable WPS.
- Set up a guest network.
- Save changes, reboot, reconnect devices.
👉 Once you walk through this setup once, you don’t have to mess with it again. It’s like tuning a guitar—do it properly and it stays in tune a long time, and every song (or in this case, every Netflix binge) just works.
| Security Move | Why It Matters | WiFi Guy’s Take |
|---|---|---|
| Change Router Login | Stops easy break-ins | Don’t let “admin/admin” be your welcome mat |
| WPA2/WPA3 Security | Encrypts your Wi-Fi traffic | Strong lock on the front door; WPS is a broken lock — toss it |
| Guest Network | Isolates visitors & IoT gadgets | Friends get internet, not your baby cam feed |
| Disable Remote Admin | Blocks outsiders from tweaking settings | Nobody needs to configure your router from Timbuktu |
| Auto-Updates | Patches holes hackers already know about | Updates = duct tape over known leaks |
| Backups | Saves your bacon after ransomware/crash | Like insurance for your wedding pics & tax docs |
| Monthly Device Check | Boots freeloaders | Spot “ESP-XXXX” or “Cam_1234”? Kick it out |
| Strong Passwords + 2FA | Protects key accounts | One leak won’t domino your whole life |
Updates Without the Headache
- Turn on automatic updates where possible.
- Put a calendar reminder for devices that don’t update themselves.
- Don’t ignore firmware banners in router apps—those are often plugging known security holes.
👉 Updates feel boring, but here’s the thing: hackers count on you being lazy. They already know about the holes in older firmware. Installing an update is basically slamming that hole shut before someone wiggles through.

Firewalls, MAC Filters & Other Nerdy Buttons
- Leave your router firewall on—it blocks random junk from the internet.
- Skip MAC filtering; it’s a hassle and easy to bypass.
- Avoid random port forwards; if you need access to something at home, use a VPN.
👉 Think of the firewall as your bouncer at the door: “You’re not on the list, you’re not coming in.” It’s quiet, automatic, and it doesn’t need much babysitting—just leave it on and let it work.
Phishing: Where Most Hacks Actually Start
- Don’t click login links in emails or texts—type the site address yourself.
- Ignore pop-ups claiming your computer is “infected.”
- Use a password manager + 2FA (authenticator app preferred).
👉 Most hacks don’t start with Hollywood-style hackers pounding on your Wi-Fi—they start with someone tricking you into handing them the keys. Stay skeptical, and you cut off the #1 way cyber crooks sneak in.
Backups That Actually Restore
- Use the 3-2-1 rule: 3 copies, 2 types of storage, 1 off-site.
- Test a restore at least once.
- Use File History (Windows) or Time Machine (Mac) if you don’t want to overthink it.
👉 Backups are boring… until you lose your wedding photos or tax files. Then they’re priceless. Do it now, thank yourself later. It’s like insurance: you hope you never need it, but when you do, you’re glad it’s there.
Quick Checklist
✔ Router admin login changed
✔ WPA2/WPA3 on, WPS off
✔ Guest network active
✔ Remote admin/UPnP disabled
✔ Devices and router up to date
✔ Backups working and tested
✔ Unknown devices removed
✔ Passwords unique + 2FA enabled
👉 Stick a list like this on your fridge or desk. Five minutes of glancing at it once a month keeps your digital house locked up tight.
WiFi Guy’s Take
Security doesn’t have to be complicated or scary. Most of it comes down to common sense and consistency. Do the basics once, keep things updated, and don’t fall for shady links. The result? A network that just works, and peace of mind that your stuff isn’t up for grabs. And that, my friend, is worth the 10 minutes you’ll spend locking it down.
FAQs
Q: WPA2 or WPA3—what should I use?
A: WPA3 if everything in your house supports it. If not, WPA2-AES is fine. Just don’t use anything older.
Q: Do I need MAC filtering?
A: Nope. It’s like checking IDs at the door but the IDs can be faked. Stick to WPA2/WPA3 + a guest network.
Q: Should I hide my Wi-Fi name (SSID)?
A: Doesn’t add real security and just makes life harder for your devices. Keep it visible, keep the password strong.
Q: Is my ISP’s modem/router combo safe enough?
A: It works, but you get way more control with your own router or mesh system. At least put the ISP box in bridge mode.
Q: How often should I change my Wi-Fi password?
A: Not on a timer. Change it if someone moves out, you lose a device, or you think it leaked.
Q: What about smart gadgets like bulbs and cameras?
A: Stick them on a guest/IoT network so they can’t mess with your main stuff. Update their firmware, too.
Q: I did all this—what’s next?
A: You’re ahead of most people already. From here, it’s just staying updated and keeping good habits.

![Norton 360 Deluxe 2026 Ready, Antivirus software for 3 Devices with Auto-Renewal – Includes Advanced AI Scam Protection, VPN, Dark Web Monitoring & PC Cloud Backup [Download]](https://m.media-amazon.com/images/I/41CUTfRuxEL._SL160_.jpg)
![Norton 360 Deluxe 2026 Ready, Antivirus software for 5 Devices with Auto-Renewal – Includes Advanced AI Scam Protection, VPN, Dark Web Monitoring & PC Cloud Backup [Download]](https://m.media-amazon.com/images/I/51Ovcl9mAAL._SL160_.jpg)

![Norton 360 Premium 2026 Ready, Antivirus software for 10 Devices with Auto-Renewal – Includes Advanced AI Scam Protection, VPN, Dark Web Monitoring & PC Cloud Backup [Download]](https://m.media-amazon.com/images/I/51eODAreA9L._SL160_.jpg)
🧠More WiFi Brainiac Tips

WiFi Guy’s World

400-Dollar Smart Home Setup For Renters

pcWRT PW-AX1800 Wi‑Fi 6 VPN Mesh Router — High Security at a Low Price

Routers With High-End Security And Easy VLAN Support

These Wi-Fi 7 Mesh Bullies Crush Dead Zones

Start Your Smart Home Off Right With These 3 Top Smart Hubs

Find Your Perfect VPN Wireless Router — Easy Picks

Serious Security For Your Home Network

Wi-Fi Extender Face-Off: TP-Link RE600X vs Netgear EAX15
Home Network Engineer Course
✅ You’ll Be Able To:
- Fix Wi-Fi and device problems fast – Know what’s wrong and how to handle it
- Speed up your connection – Boost coverage, kill lag, and reduce dropouts
- Lock it down – Protect your network from freeloaders and shady devices
- Upgrade with confidence – Know what gear to get (and what to skip)
- Stop second-guessing yourself – Never be scared of a blinking router again
Last update on 2026-04-18 at 20:42 Affiliate links and Images from Amazon Product Advertising API