How To Extend Your Wi-Fi Network
Doing all the work to set up a wireless home network and finding you don’t have Wi-Fi coverage in some of the most important areas in your home can be frustrating. There are a number of ways to overcome this problem. In this chapter, I’m going to try to simplify the somewhat confusing topic of extending your network with Wi-Fi extenders, Powerline, and Mesh Wi-Fi systems.

We’ll discuss four major ways to extend your Wi-Fi network:
- Put one router into “AP mode” and connect it to the other router with a cable.
- Use a wireless repeater or extender to extend your wireless signal.
- Use Powerline adapters to use the electrical wiring in your home as a wired connection between your routers.
- Mesh
This article will get pretty long. If you’re not interested in all the above ways to extend your wireless signal feel free to skip to the method that interests you.

Extend Your Wi-Fi Network With A Second Router
If you’re lucky enough to have Ethernet cables running through your walls or if you’re willing to run some yourself, you’re in luck. A wireless router connected to a cable is the easiest, cheapest, and best way to extend your wireless coverage.

In this scenario, your “repeater” becomes an “AP” or “bridge.” Many wireless routers have a built-in setting that allows you to switch them over to “AP mode.” Sometimes this functionality can be added with a firmware update. Even if it’s not a built-in feature just about any wireless router can be converted to an AP with a few simple setting changes.
- Change its IP to something different than your primary router’s IP. For example, if your primary router’s IP is 192.168.1.1 change the secondary router’s (Soon to be AP) IP address to 192.168.1.2. Keep in mind that to talk to each other the first three octets (The 192.168.1 part) on both routers need to be the same.
- We only need one DHCP server so disable DHCP on the secondary router.
- More than one firewall per network can also cause confusion so disable the firewall and any NAT settings on the secondary router.
- The routers don’t need to have identical SSIDs and passwords. This is not a fancy mesh system that automatically disconnects and reconnects to the same SSID as you roam around the house. Yes, routers are designed to hop on the strongest signal automatically but “automatic” does not always mean “automagic.” Sometimes a router will cling to the connection it’s on even if there’s a better option. For this reason, it’s best to have different SSIDs just to be able to tell which one you’re on and do the connecting and reconnecting manually. It only takes a few seconds.

- Connect one end of your Ethernet cable into a LAN port (Not the WAN port.) on the primary router to a LAN port on the AP and you’re done. Eazy Peazy!
Extend Your Wi-Fi Coverage With Wi-Fi Extenders
Another quick and easy way to get some wireless coverage in a distant corner of your home is to purchase a wireless range extender. Almost no configuration is needed with these devices. They are ready to go as soon as you take them out of the box.
How To Set Up Wi-Fi Extenders
It’s basically the same concept as converting an old wireless router into a repeater as we did before without all the confusing configuration. Most of these devices have little lights and indicators which tell you when they’re configured and positioned properly. Many have apps to make the configuration easier and some even have ethernet ports you can use to extend your wired LAN.
Wireless devices connected to a wireless range extender will not receive the same speeds as devices connected to the main wireless router. This is because of the “double duty” it must perform to maintain simultaneous connections with wireless devices and the base station. Even so, a wireless range extender can be a good solution if you have a few devices in a corner of your home which are starving for a wireless signal.


Wireless range extenders usually offer the option of setting them up with a web browser or with a push-button method of security called WPS. WPS stands for Wi-Fi Protected Access. WPS was created to help people avoid typing in painfully long passphrases.
Unfortunately, in 2011 a security hole was found that allows WPS security to be hacked by brute force attacks. Brute force attacks are done by using specialized tools and skills to bombard a device with possible passphrases until the right one is found. Attempts have been made to slow this process down but the only known permanent fix is to disable WPS on your wireless router.
It’s important to understand that the skills and tools needed to successfully perform an online brute force attack are highly specialized. While I’m not advocating anyone open themselves up to “online hacking” today hackers are usually employed to go after business, financial, and government databases – not home networks.
Let your own personal or business security concerns be your guide.
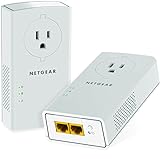
If you want to avoid WPS you can use a range extender that offers the option of setting it up with a web interface like the Netgear AC750 below. I’ll demonstrate both ways in this course.
The exact buttons and lighting setup may vary but setting up a range extender using WPS usually involves the following steps:

- Plug the extender into an electrical outlet in the same room as the main wireless router.
- Hit the power button.
- When the Power LED is green hit the WPS button. The WPS LED should blink.
- Within 2 minutes hit the WPS button on the router.
- When the Router LED should come on indicating the extender is connected to the router.
- If you have a dual-band router repeat steps 3 and 4 to connect the range extender to the 5Ghz band.
- Use your computer’s Wireless connection utility to connect to the newly connected network. It will be labeled something like “MyNetwork_Ext2” or “MyNetwork_Ext5.”
- Unplug the extender and move it to the area of your home with a weak signal.
- Find the optimal spot for the extender by using the Router and Device LEDs. If the light is green you have a good connection. If it’s red or amber move the extender closer to the router.
- Use the same procedure as in step 9 with the Device LED. Green means you have a good connection. If it’s red or amber move the device closer to the range extender.
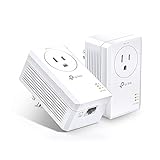
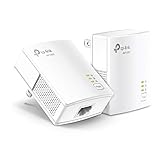
Extend Your Wi-Fi Network With Powerline Adapters
Anything to avoid pulling cables. After spending a year installing WiFi in hotels I can relate to the aversion people have towards pulling network cables. Imagine my dismay when finding out my cool new “WiFi job” was all about drilling holes and pulling cables through walls and ceilings. It can get expensive, messy, and dangerous.
How To Set Up Powerline Adapters
To me, Powerline is the perfect example of how desperate people are to avoid running cables in a home. It fits neatly into the “It’s so crazy it just might work” category. In some cases, it works amazingly well and in others, it will leave you scratching your head. You won’t know for sure until you try it.


Powerline uses the electrical wiring in your home as network cabling. Don’t worry, the devices are designed to protect you from the possibility of electric shock. The deciding factor of your powerline project’s success is not the devices themselves but the wiring in your home. The quality of wiring in newer homes is better suited to Powerline. Then there’s interference caused by the devices you have plugged into your AC outlets. Another bothersome issue is separate circuits in a home causing a break in the connection.
More modern Powerline technology can find its way past circuit breakers to different circuits in your home using ground lines but the signal will degrade. This presents another issue. If you live in an apartment building the electrical wiring may have several apartments on the same circuit. If that is the case you’re making it easy for neighbors to hop on to your network with their own Powerline adapters if you don’t properly password protect it.
The process of setting up Powerline extenders is almost identical to setting up wireless repeaters. The typical Powerline kit includes two devices. One connects to your wireless router and the other goes into the room you’re trying to extend your wireless coverage into. The device at the far end picks up the network signal through the electrical wiring in the house and extends it into the room with wired and wireless connections. Brilliant!

It’s not recommended to use power strips and surge protectors on a Powerline network because they generate signals which can confuse a Powerline adapter. Even so, it’s fine to use a power strip temporarily for the initial synchronization process.
To get started plug both devices into outlets that are close to each other. Power them on and hit a “Pair” button on both devices. They will eventually communicate and sync up with each other. You’ll be able to tell when they’re “ready” when certain lights start flashing, blinking, and eventually become steady green.
Many Powerline adapters offer a “clone” feature. This enables the remote node to duplicate the settings on your wireless router and eliminates the need to enter a new SSID and passphrase when in range of the remote node. This isn’t quite as seamless as Mesh (See next chapter.) but it’s still a nice feature.

Once your Powerline adapters are plugged into AC outlets in the same room, you’re ready to sync them up:
- Hit the “Pair” buttons on both adapters within 2 minutes.
- The lights will blink randomly at first. When they blink steadily the adapters are paired or synced up.
- Use the “Clone” button to duplicate the SSID and passphrase on your wireless router to the Powerline adapter.
Once both power buttons are blinking steadily, they are synced up and ready to go. You are free to roam the house with your extender device, plug it into an AC outlet in an area that needs wireless coverage, and give it a whirl. As I mentioned earlier your final results will depend on the quality of the wiring in your home, and signal interference from electronic
devices. For more details on Powerline please see my video on setting up a Powerline Extender.
Mesh Networking
You’ve probably already seen the commercials and the hype surrounding Mesh Wi-Fi. Then after seeing the prices, you probably wondered “Is it worth it?” I’ll attempt to answer that in this chapter.
How To Set Up A Mesh Network
As far as I’m concerned one day all home wireless networks will be Mesh networks. The traditional wireless routers we use today will be seen as the “old-fashioned way” of doing things.

Mesh can provide reliable, fast speeds and coverage to all corners of a large home. Setting a Mesh network up is almost as simple as plugging it in and turning it on. Unfortunately, Mesh is still a new technology and as new technology, it’s still expensive. Fortunately, as new technology becomes more developed and commonplace prices come down.
Mesh prices are coming down already. There are some very affordable 3-node mesh systems like the TP-Link Deco M5 that offer similar performance to high-end systems like Google Mesh available now for well under $200. So, the future is now.


Affordable Mesh systems offer the same advantages as more expensive mesh systems in terms of speed, range, and ease of setup. The difference in the price of Mesh systems is more related to the software than hardware performance. A Mesh system at the higher end of the price spectrum will have a wide range of configuration options, features, and parental controls while a low-end device will have fewer features and allow limited configuration and customization.
Advantages of Mesh Over “Traditional” WiFi
Even with all their advanced options wireless routers are still very basic radio devices. They are designed to pass data back and forth to devices over the 5ghz and 2.4ghz bands.
A Mesh network is made up of multiple “nodes.” Each of these nodes is a separate wireless router with a special 3rd band. The frequency of this 3rd band is not subject to interference from the other bands. It’s used to communicate directly with other mesh nodes of its own brand. This allows each node to have a dedicated channel to communicate and coordinate with other nodes.
The magical 3rd bands of a mesh network can automatically prioritize your connection based on the signal strength and distance to the node nearest to you. As a result, your devices will automatically disconnect and reconnect to the nearest node without dropped connections as you move around your home. Mesh networks also allow you to set up one SSID for the whole house. This means you don’t have to remember and type in different SSIDs and passphrases every time you move to a different spot in the house.
Advantages of Mesh over Repeaters and Extenders
- Easy to set up.
- More coverage.
- While Powerline offers the convenience of “cloning” your wireless router settings and allowing the same SSID and passphrase across multiple devices the handoff process is not as seamless as Mesh.
- An issue with Powerline is its signal quality can be severely limited by the quality of the wiring in your home (See the previous chapter on Powerline.)
- Mesh nodes don’t cut your bandwidth and speed in half as wireless repeaters do. The dedicated 3rd band leaves the other two free for connecting to devices.
- With Mesh, you normally don’t have to worry about which Band to place a device on. With Mesh, these bands (2.4Ghz and 5Ghz) are combined into one. The mesh network automatically decides which band is best for each device.
Mesh addresses an issue with repeaters and extenders some like to call “stickiness.” Usually, a wireless device will not automatically drop a weak signal and hop on to a stronger one. Instead, it will hang on to its original signal until it becomes almost unusable. To connect to a stronger signal with a wireless repeater you’ll have to manually disconnect and reconnect from one SSID to another as you roam around. Mesh will automatically drop a weak connection in favor of a stronger one as you roam. Since it’s all the same SSID and passphrase the “handover” is seamless.
Disadvantages of Mesh
- Cost – although as I mentioned earlier this is coming down.
- Some mesh systems only allow for configuration through an app and not a web interface. The phone apps are somewhat limited in the settings you can change. The web interface of wireless routers offers more granularity and control.
Setting Up A Mesh Network
Setting up a wireless mesh network differs from setting up a wireless router in that instead of using a web browser you’ll be using an app on your phone. It’s a very simple wizard-driven process that involves little more than following the instructions on your phone and clicking “next.” The app does almost all the work for you.
The basic breakdown of setting up a Mesh network is as follows:
- Unbox the nodes and plug them into AC power in the various locations you think you’ll need them.
- Remove your current wireless router from the equation by disconnecting it from your modem.
- Reboot your modem to remove any remnants of the wireless router settings from its memory.
- Connect the WAN port of the main mesh node to the same port you had your wireless router connected to.
- Power the main node on.
- Download and install the manufacturer’s app on your phone.
- Either type in a number from the back of the main node into the app or scan the node’s QR code to identify it.
- Create a username and password on the mesh system using the phone app.
- Allow your new mesh network to initialize.
- Use the app to name your nodes with names such as “Bedroom,” “Den,” etc.
- Use the app to find an optimal position for your mesh nodes. This will usually involve a color code in the lights of each node specifying whether the device is too far or too close to the nearest node.
- Test the network speed of your mesh network.
The sequence of events involved in setting up a mesh network varies slightly from brand to brand. For example, with the Thingy Doohicky, the connection between nodes comes hard-coded out of the box so you don’t need to type in any numbers or scan a QR code.
To give you an idea of what to expect this is how setting up the popular Netgear Orbi looks.

- Download the app.
- Create an account.
- Scan the QR code on the main node or router.

- Reboot your modem.
- Plug the cable from your modem into the WAN port of the router.
- Place the satellite nodes around your home.

- A blue color ring on each node indicates a strong connection. An amber or magenta color indicates the node is too close or too far.
- Select “cancel” or “join” for the node to join the pre-configured mesh network.
- Allow the app to detect all your mesh nodes. You may need to move them around to be auto-detected.

- Enter an admin username and password to log in and configure your mesh network.
- Allow your nodes to run firmware updates.
- Explore the other settings you can use to customize your mesh network.

Once your new mesh system is ready to go you can connect devices using the SSID and passphrase printed on the bottom of the main node. If you like you can change them later when logging in with the Admin password you created in step 10.
If you’ve been following along with the Home Network Mastery series you now know quite a bit about how networks work and how to set up certain Wi-Fi devices. Next, we’ll learn about what to do if your home network doesn’t work and how to fix it in the Basic Network Troubleshooting section.
Last update on 2026-04-18 at 21:28 Affiliate links and Images from Amazon Product Advertising API