Wired Home Networking – How It Works
Many people see wireless networking as the eventual replacement for wired networking. The truth is that wired networking isn’t going anywhere. Wireless networking will always depend on wired networking. The same principles used to set up and troubleshoot a wired network are used on a wireless network. You’ll need to understand the basics of wired networking before setting up a wireless network. Let’s discuss the basics of how wired networking works.

Home Networking Basics
The purpose of a network is to share data quickly and easily between devices. To get your data, music, and video files from one device to another they are broken down into tiny electronic packets before being placed on the network to be transported to another device.

When these packets leave your device, they each contain addressing information other computers and network devices will recognize to help each packet reach its destination. This works a lot like the address you put on an envelope.
The Post Office uses that information to get it to its destination. Once all the packets containing your data reach their destination they are reassembled and reformatted for use by the receiving device.
Simple right? Not really. If you’re curious to see how complicated this gets Google the OSI model some time. You’ll be sorry you did!
So anyway, network devices transfer these packets back and forth to each other using special connectors or cards which allow them to interface with the network. These are called Network Interface Cards or NICs for short. These cards are designed to transfer packets through wires or the air.
For all those packets to find their way to their correct destination there needs to be some way to distinguish one computer, laptop, or mobile device from another. Since computers find it easier to understand numbers instead of names this is done with a set of numbers called a network address, IP address, or IP for short.

If more than one device connected to a network has the same IP address, you’ll have an IP address conflict. Imagine trying to have a conversation with identical twins with the same name. This will make it difficult or impossible for those devices to communicate on the network. It may even interfere with other devices on the network.
For this reason, managing IP addresses correctly is very important. Back in the old days, computers were manually configured with IP addresses. The resulting human error led to confusion on a grand scale on both large and small networks.
DHCP
Very few IP addresses on today’s networks are static or fixed. Most are dynamic and change frequently. Computers crash, laptops come and go, and printers break. It became obvious that a way to automatically adjust to these changes while preventing IP conflicts was needed.
So, the Amazing Intergalactic Network Whizbangs (Or something like that.) came up with an ingenious protocol that dynamically configures computer hosts automatically. This protocol is called Dynamic Host Configuration Protocol or DHCP for short.
Sounds complex and expensive right? Not really, the cheapest wireless router you can buy at an electronics store has its own built-in DHCP server. It can easily be turned on or off. The DHCP server maintains a list of IP addresses assigned to devices on its network. It also stores a list of available IP addresses to be used by new devices.
When you connect a new device to your network it sends out a signal looking for an available DHCP server. Once the DHCP server and new device acknowledge each other the server assigns the device an IP address it can use safely.
This is assignment is called a lease and usually only lasts a few days or weeks. Usually, a single IP address will bounce around to several different devices over time.
So, if IP addresses change how does the DHCP server avoid confusion? How does it know which device is which? It uses a special code that is embedded into each device’s NIC card called a MAC Address. In theory, no two MAC addresses in the world are identical.

We call DHCP IP addresses dynamically assigned IP addresses because the DHCP database is always changing. A DHCP server may assign one IP address to a MAC address one week and assign that same IP address to a different MAC a few weeks later.
When a device is turned off or removed from the network it releases its IP address back to the DHCP server for use by other devices. This usually happens after a specified waiting period.
To me, DHCP is like magic. It breathes life into a network. It almost transforms a pile of electronic impulses into an ever-evolving, self-maintaining, self-healing living being.
Not all IP addresses are assigned dynamically. Sometimes certain computers, printers, and servers need static IP addresses that never change so other devices on the network can always find them.
Static IP addresses are usually stored in the same DHCP database as dynamic IP addresses. The difference is they are placed in a special static range which prevents them from being used as dynamic IPs. As you now know this would result in an IP address conflict. This could be especially disastrous on a corporate network if the IP address to a mail server or DNS server suddenly becomes unreachable.
Oops, I just dropped a technical term on you without an explanation. What the heck is DNS you ask? DNS is probably the most important network service on the Internet. Without DNS there would be no Internet. Computers would be lost without it – literally.
DNS
DNS is like the contacts list on your phone. Let’s say you want to call Bob. You probably don’t even remember Bob’s number. You simply look him up and tap on his name. The phone looks up Bob’s number and calls his phone. Bob’s phone rings, your phone number is saved on his phone, and hopefully, Bob picks up. DNS does basically the same thing. Instead of matching human names to phone numbers, DNS matches Internet domain names to IP addresses.

There are DNS servers scattered all over the Internet just waiting to show you how smart they are by matching your domain name to a valid IP address. If they don’t know your domain name, they have a database of other DNS servers that do. Your request will then be forwarded to one of those DNS servers and the results will be returned to you in milliseconds.
All you have to do is type in a domain name and hit enter. It’s an amazing thing and one of the reasons computer networking provides us with such easy access to the rest of the world.
You may be wondering what good is an explanation of DNS, DHCP, and IP addresses if it’s all hidden away on the computer somewhere. so how do you access it? How do you see it and change it? That’s what we’re going to talk about next. Most of the information you need to know about your computer’s connection to the network can be seen with a simple command-line tool: ipconfig /all (Short for IP Configuration.)
The ipconfig /all command instantly displays:
- IP Address
- Whether your IP is static or dynamic
- DHCP server
- MAC address
- DNS server
- Gateway address
Wait, what? Gateway address? Did I just drop another technical term on you with no explanation?
Gateway
Many people don’t realize this, but computers are rarely connected directly to the Internet. Instead, they’re connected to a router and access the Internet through its gateway address. A router is a special network device located physically in the same building as the local network. One side of the router connects to the public Internet or WAN. The other side connects to your private local area network or LAN. The connection on the LAN side is the gateway address.
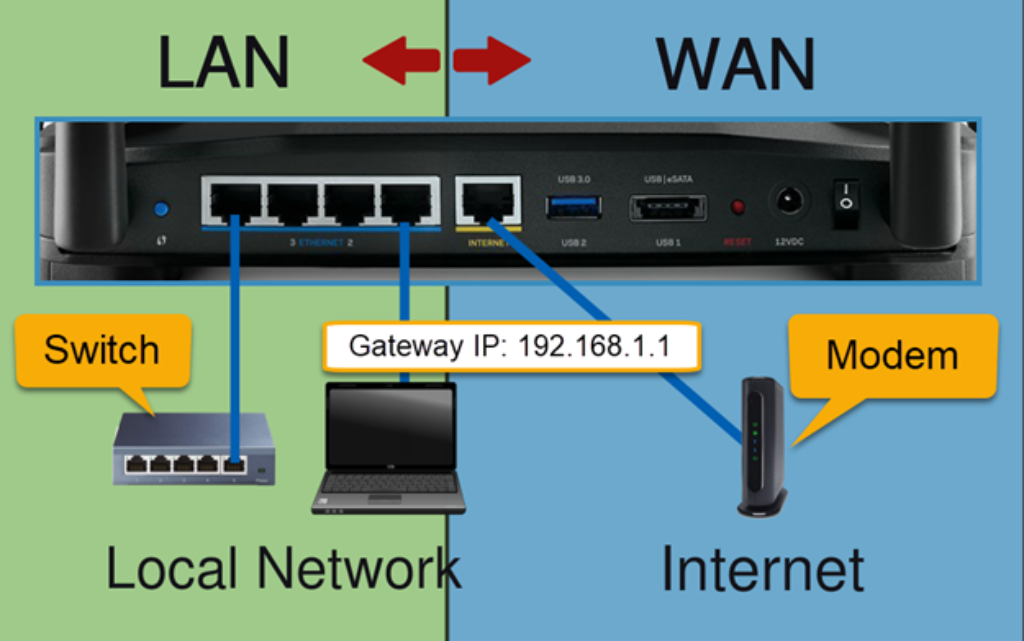
An Internet connection usually enters a home through a modem. It may be a DSL modem that runs on phone lines or a Cable modem that runs on coaxial cables like the ones used to connect cable service to your TV. Cable Internet is much faster and more modern than DSL. Many Cable Internet providers are now integrating fiber into their circuits which results in speeds that were previously unheard of.
The modem converts the analog signal coming into your home through the coaxial cable into a digital signal and sends it to your router. The router then transfers that digital signal to everything connected to it through its wired and wireless connections.
Many times, an ISP will provide customers with a Modem/Router combo device. This is a modem with a built-in wireless router. It sounds like a good idea at first but it’s usually horrible in its implementation. These devices usually have stability issues and poor wireless performance. When it comes to a combo device it’s best to turn its wireless router function off and connect it to a wireless router of your choice. This can be done by calling your ISP and having them switch it over to “bridge mode” for you.
As much as we’ve all come to love and depend on wireless networking it’s no substitute for wired networking. You want things like HD TVs and game consoles connected with ethernet cable whenever possible. Not only does this improve the performance of those devices it also improves the performance of other wireless devices by not needlessly hogging their bandwidth.
Unfortunately, most wireless routers come with only 4 LAN ports. This can easily be overcome with the use of a cheap 5-port switch like the Netgear GS305. A switch simply retransmits a signal to more devices. Don’t get crazy with switches though. It’s OK to connect a switch directly to your wireless router but connecting switches to more switches is not a good idea. It’s known as “daisy-chaining” and can result in unreliable performance.

When a computer on your home network wants to access the Internet, it sends packets -electronic bits of data – to the router’s gateway address. The router then politely sends those packets to the Internet while preventing direct access to the computers on your local network from the perils of the Internet. Nice huh?
Think of your home network as an apartment. You can easily get to other rooms in your apartment but to get to rooms in other apartments, you need to leave your apartment through its exit door to get to other apartments in the building or down the street. The exit door to the Internet for your home network is the gateway address.

LAN Or WAN?
You need to understand the difference between the two main network types you’ll be dealing with in any given situation – the LAN and the WAN.
- LAN stands for Local Area Network – also known as the local network. This is your home network. This network uses private IP addresses that are not accessible to WAN computers on the Internet without the use of a router.
- WAN stands for Wide Area Network – also known as the Internet. This network uses public IP addresses that cannot directly access private IP addresses without the use of a router.

NAT
A sophisticated process called Network Address Translation or NAT allows the IP addresses on your LAN to communicate with the IPs on the Internet through your single WAN IP address. NAT provides access to the internet while hiding the identity of your local computers. This is an additional layer of security to your firewall and is standard on most home wireless routers.
Checking Your Computers Network Settings
OK, enough idle chit-chat. Let’s actually use the ipconfig /all command from the command prompt to check your computer’s network settings. The command prompt is a pop-up window you can use to enter text commands instead of using a mouse. Once you have the command prompt open the commands are identical for Windows 7 and Windows 10.
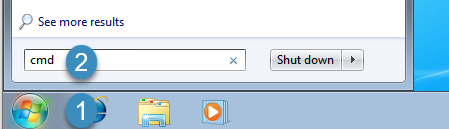
To open the command prompt in Windows 7:
- Click on Start.
- Type cmd into the search field and hit Enter.
To open the command prompt in Windows 10:

- Type cmd in Search
- Hit Enter

- Type ipconfig /all and hit Enter.

Your IP address is conveniently buried in all this text along with your other network settings. It may seem a little confusing at first but once you learn how to recognize each setting this is the fastest, easiest way to find out about your computer network connection.
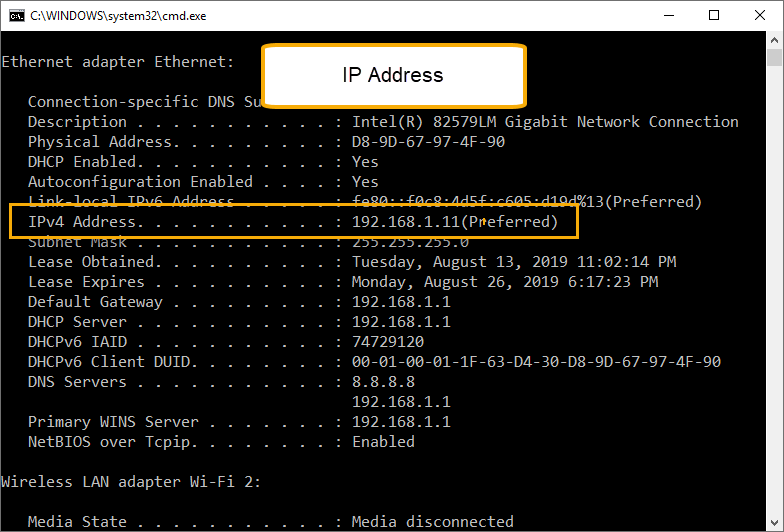

The setting above is DHCP Enabled: Yes or No. If it says “Yes” that means your IP address was automatically assigned by DHCP. If it says “No” that means the IP address was assigned statically and will not change.
DHCP stores your MAC address in its database to keep track of your IP address.

The Default Gateway is your LANs exit door to the Internet

Notice how the IP addresses for DNS, DHCP, and the Default Gateway are the same. That’s because on most home networks these functions are handled by the wireless router. If you like you can add a secondary DNS server. Many people like to fall back on the reliability of Google’s DNS server. The Google DNS server IP address being used here is 8.8.8.8.
Don’t worry about the rest of the information in this window. It’s outside the scope of this course. Try the ipconfig /all command on your computer now so you can get a feel for it. We’ll be looking further into ipconfig in the section on troubleshooting.
Changing Your Computers Network Settings
Now that you know how you check your network connection settings let’s look at how to change those settings. To do this we go to Network and Sharing Center.
Network and Sharing Center in Windows 10 is identical to Windows 7, but the way to get to it is slightly different. Hover your mouse over the little icon to the left of the clock in the lower right-hand corner of your screen and right-click on “Network and Sharing Center.”
To get to Network and Sharing center in both Windows 7 and 10:
- Right-click on the little monitor icon next to the clock.
- Select “Open Network and Sharing Center” or “Network and Internet Settings” in Windows 10
Windows 10 adds the extra step of the Network Status page. You can learn a lot from poking around in here. For now, we’ll go straight to “Network and Sharing Center.”

Network and Sharing Center is at the bottom of this huge pop-up screen. Simply scroll down to the bottom and click on Network and Sharing Center.
Welcome to Network and Sharing Center. This is where most of your computer’s network settings can be changed. It’s also a great troubleshooting tool.
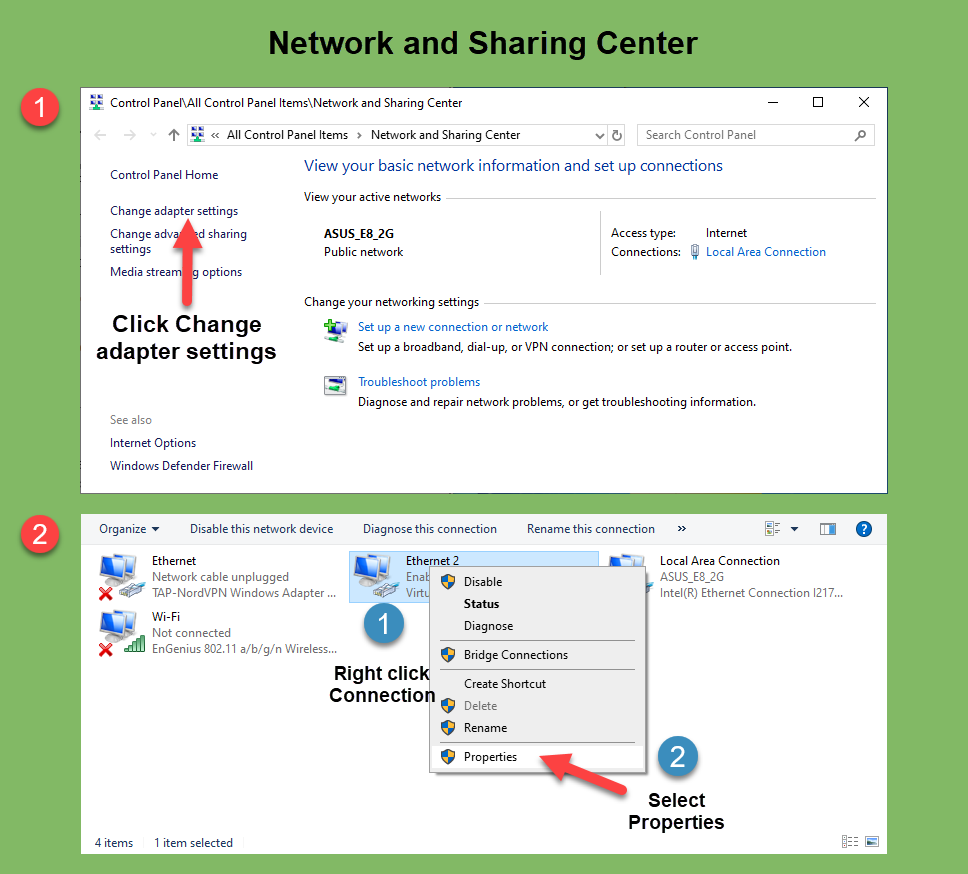
To access and change your network adapter settings:
- Click on “Change Adapter Settings” to see your Ethernet, Wi-Fi, and VPN adapters
- Select an adapter, right-click on it, and select properties.

To change your adapter properties:
- Highlight TCP/IPv4
- Click Properties.
This is where you change the IP settings on your adapter.
Now is a good time to make some changes and see how they look when you run ipconfig /all at the command prompt. It would probably be a good idea to do a screen capture of your settings first to keep from knocking your computer off the network and forgetting what your settings were.
We’ll go deeper into changing these settings and checking them with ipconfig /all in chapter 6 – Basic Network Troubleshooting.
That takes care of the section on wired home networking. You should be feeling smarter already! In the next section, we’ll cover how wireless home networking works before diving into setting up a wireless router in the section after that.