Use A VPN To Access Home From Anywhere
Maybe you have a job where the IT department sets you up with a travel laptop that allows you to remotely control your computer in the office or use your remote laptop just like it was sitting in your office at work.
You may have thought to yourself, “Wow this is cool. I wish I could do this with my home computer!” Then you might think, “Naah! It’s probably way too expensive and complicated to do this myself!”

You may have found yourself in many situations where you desperately wanted to be able to access your home computer from a remote location. In this chapter, I’m going to show how this can be done easily and for free.

When you finish this chapter you should be able to easily access your home computers from just about anywhere with an Internet connection in one of three ways:
- Port Forwarding
- PPTP VPN
- OpenVPN
Note: This was a tricky section. I considered removing the port forwarding section. Why? Because if done wrong port forwarding can be dangerous. Port forwarding is useful for hardened devices such as IP cameras and game consoles but opening a port on the Internet to one of your PCs (As I do in the example) is asking for trouble.
I chose RDP port 3389 in my example because the use of a single, extremely useful port makes the exercise much easier to follow. That being said please keep in mind the section on port forwarding is for informational purposes ONLY. I decided to leave the port forward section in because a good understanding of how port forwarding works is a very useful tool for a true Home IT Guru to have in his toolbelt.
An easier and much more secure way to access your home network from a remote location is with the use of a VPN. To set up a VPN you need to set up DDNS. If you have no interest in port forwarding skip to the DDNS Setup section, disregard the port forwarding settings, and then skip to the Your Own Virtual Private Network section.
Port Forwarding
Warning: This topic has been known to burst a few brain cells. There are also risks associated with port forwarding. Opening ports on a home computer to the evils of the Internet can have disastrous consequences. The purpose of this chapter is for demonstration purposes only. It’s just another tool on your toolbelt. If you have no interest in port forwarding right now feel free to skip to the VPN section of this chapter. VPN is easier and more secure than port forwarding. If you simply want to remotely control a computer across the Internet see “Chapter 13 – Remote Control.”
So what is port forwarding? Port forwarding allows you to access certain services on your home network from across the Internet. By “services” I mean web servers, games, IP cameras, and applications on your NAS. Let’s say you set up a web server on your home or small business network on IP 192.168.1.10. If you type that IP into a web browser the home page of your website pops up. Since you’re using a web browser it automatically looks for port 80. Port 80 is the default web service (HTTP) port.
Behind the scenes accessing your webserver looks like this:
192.168.1.10:80
Translation: “We are accessing (HTTP) port 80 on IP 192.168.1.10.” Make sense? Think of the IP address as a house address on a street and the port number as a specific room in that house.
So what if we want to access the webserver from across the Internet? As you learned earlier your web server’s IP address is private and cannot be accessed from the public Internet. So what can we do? We use our wireless router’s external public IP address. We then use port forwarding to tell it to forward all requests for port 80 on the router’s external IP address to our internal web servers’ IP address.
Behind the scenes it looks like this:
204.143.21.144:80 > 192.168.1.10:80
Translation: We are forwarding all requests for port 80 on the router’s external IP address of 204.143.21.144 to the internal IP address of 192.168.1.10.”
Don’t worry if you feel yourself slowly slipping in and out of consciousness right now. That’s normal. This will all become clearer as we get into our example.
Caution: Port forwarding uses no encryption and leaves one or more ports on your router exposed to the evils of the Internet. I DON’T recommend enabling port forwarding to a computer permanently. I would only enable port forwarding to a computer on an as-needed or emergency basis.
Once you have your port settings set up you can securely enable and disable port forwarding itself while you’re away from home using Secure Remote Administration. I’ll show you how to do this at the end of this chapter and once again at the end of “Chapter 12 – IP Cameras.”
Warning? Caution? In the back of your mind, you may be wondering, “If port forwarding is such a pain and so insecure why even bother with it at all?
- Port forwarding is perfectly safe to use with game consoles and IP cameras. These devices are “hardened” and designed to be used on the Internet 24/7.
- The ability to access and take control of your computer while away from home in a pinch is a great skill to have.
- Important explanations on setting up DHCP reservations and setting up a DDNS service are included in the section on port forwarding. A good understanding of these topics will always come in handy.
The port forwarding example in this chapter uses RDP as its guinea pig. RDP has only one port so it’s simple. Not everyone has a game console, IP camera, or NAS to test this on. I intend to provide a simple example of how port forwarding works. It’s not a recommendation to leave these ports open to a PC.
Port Forwarding With RDP
All Windows computers come with a great utility called Remote Desktop Protocol or RDP for short. You can use it to take remote control of computers on your network. Unfortunately, RDP only works on Windows Pro computers. That means you can control a Windows Pro computer from a Windows Home computer but not the other way around. Weird right?
There’s a free program you can use that is just as good, if not better than RDP, called TightVNC. Instead of using RDP port 3389 in your port forwarding settings, you can use TCP ports 5500, 5800, and 5900. I’ll show how this is done in the “Port Forwarding Setup” section below.
You’ll find a detailed explanation of how to use both RDP and TightVNC in “Chapter 13 -Remote Control.”
Go ahead and type RDP in your search bar and check it out. You’ll get something like this.

- By “pointing” RDP at a computer’s name or IP address you can take control of that computer just as if you’re sitting in front of it. You may have seen IT guys do this to your computer at work.
First, we need to enable RDP on the remote computer. Run over to another computer and get its IP address. While you’re there type allow remote into the search bar and click on “Allow remote access to your computer” when it pops up. Next to “Change settings to allow remote connections to this computer” click “Change Settings.”
The following window will pop up.

- Make sure “Allow remote connections to this computer” is checked. This tells the computer to allow RDP on port 3389 to access it from other computers.
As you saw in the section on QoS games and applications use specific ports. Computers not only talk to each other using IP addresses but with port numbers as well. RDP runs on port 3389. A port number is designated after the IP address with the colon symbol.
192.168.1.3:3389
This is a computer telling another computer “Hey, I’m talking to you. Please let me speak to port 3389. Thank you very much.” Why is this important now? You’ll see in a second.
From the RDP login screen, you can enter a computer’s IP address or its computer name to connect to it. In my case, the computer name I want to connect to is “Aristotle.”

- Enter the remote computer’s name or IP address.
- Click “Connect.”
- In the login window that pops up enter the same username, you use to log into the remote computer.
- Enter your password for that computer.
- Click “OK.” For security reasons leave “Remember me” unchecked.
If all goes well you’ll get a screen like this:
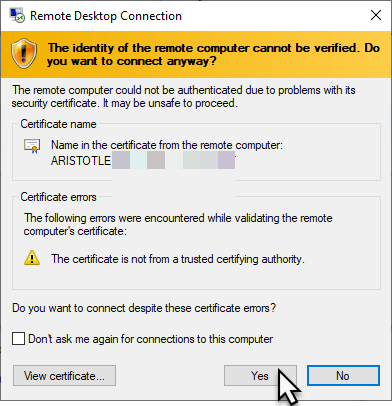
- Click “Yes.”

Wallah! An RDP screen opens up which allows you to take control of your remote computer as if you were sitting in front of it. Even if .5 has no monitor, mouse, or keyboard attached to it we can run programs, surf the internet on it and even print from it – awesome!
The RDP window can be resized, maximized, minimized, and pushed aside to allow you to work on both computers at once.
How Port Forwarding Works
To understand how this works across the Internet we need to understand what happens on our home network first.
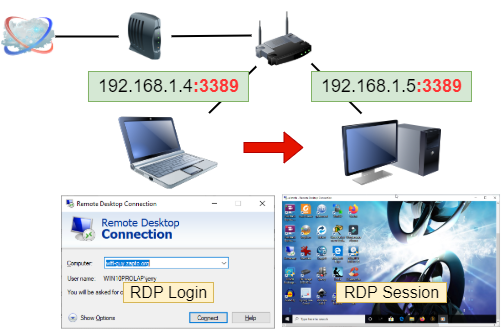
When we open Remote Desktop and type in the name or IP address of another computer on our network it sends a request to complete a connection on port 3389 (Remote Desktop Protocol) to that computer. If .5 is allowing connections on port 3389 it requests a password. If the password is correct RDP provides us with a Remote Desktop Connection to .5 from .4.
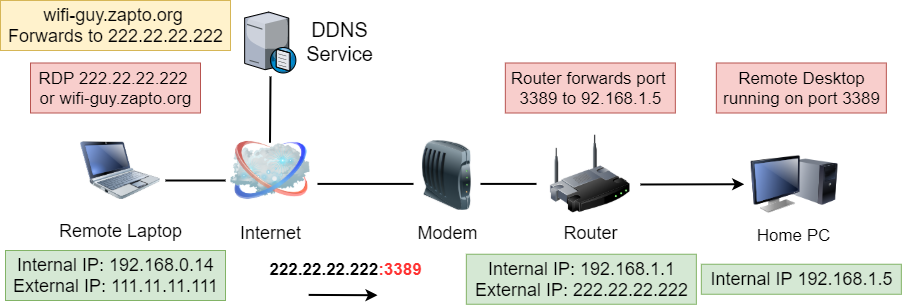
The big difference with accessing our computer across the Internet is we don’t type in our home computer’s name or IP Address into Remote Desktop. Our home computer is invisible as far as the Internet is concerned. What we can do is access the external IP address of our home router. You can find your external IP at whatsmyip.org.
To make this work we tell our home router to forward all traffic hitting its external IP address 222.22.22.222 requesting port number 3389 to internal IP address 192.168.1.5. For a better understanding see the diagram below:
The path from our remote computer to our home computer will look something like this:
192.168.0.14:3389–>111.11.11.11:3389–>222.22.22.222:3389–>192.168.1.5:3389
Once connected the remote laptop keeps its local IP address (192.168.0.14) while port forwarding provides a peek or “pinhole” into your home network on port 3389.
Access to your home computer will only be through the application using the port number you specify. In this case, we’re using port 3389 which is Remote Desktop. If we used port 80 we could be accessing a web server. If we used ports TCP 1935, 3478-3480, and UDP 3074, 3478-3479 we would be accessing Teenage Mutant Ninja Turtles in Manhattan on PS4. I’ll show you how to find and set up these ports in the next section.
DDNS Setup
At this point, you’re probably scratching your head and wondering what that weird DDNS thing is. Good question! Since internet IP addresses are hard to remember and change from time to time we want a reliable way to find our home network router’s current external IP address.
This is where a DDNS service comes in. They are usually free and easy to set up. You simply create an account and they will provide you will some software to drop on one of your home computers which will notify the service of any changes to your router’s external IP address.
It will also allow you to create an easy-to-remember domain name to use to connect to your home network. In this example, I used a DDNS service called noip.com to create a domain called WiFi-guy.zapto.org which points to my home router’s actual IP address.
I hope all that made sense to you. It’s kind of a “remote” concept for some. See how I did that? Yes I know – bad joke.
Now that you have a basic handle on the concept of port forwarding let’s set it up. Once you do it will become more clear to you even if you’re a little confused right now.
Port Forwarding Setup
To set up port forwarding I’m going to set up the following:
Your settings will differ:
- Sign up with a DDNS service and create a custom domain name. (WiFi-guy.zapto.org)
- Install a DDNS update client on my home computer.
- Configure port forwarding on my router. (Forward port 3389 on WiFi-guy.zapto.org to 192.168.1.98) Disregard if you’re using DDNS for a VPN.
- Create a DHCP reservation for my remote computer (192.168.1.98)
- Test the configuration.
It may seem like a lot on your first try but it’s a piece of cake after that. Keep in mind you can use port forwarding for more than just “Remote Desktop Connection.” You can use it for game consoles, IP cameras, a web server, and even your NAS. Note: You can only forward a port number to one IP address at a time.
By default Remote Desktop is disabled so we want to make sure it’s enabled on the computer we want to control.
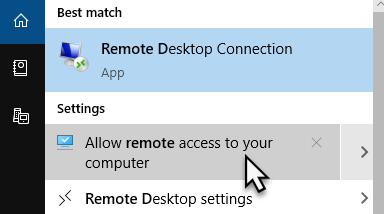
- Type allow remote in the search bar and click on “Allow remote access to your computer” when it pops up.
- Make sure “Allow remote connections to this computer.”
We already tested Remote Desktop at the beginning of this chapter so let’s get our DDNS custom domain name set up. We’ll need it to enter into the Remote Desktop login screen instead of the name of our home computer.
There are lots of DDNS services out there. One of the easiest to use is noip.com.

- Create an account and log in.
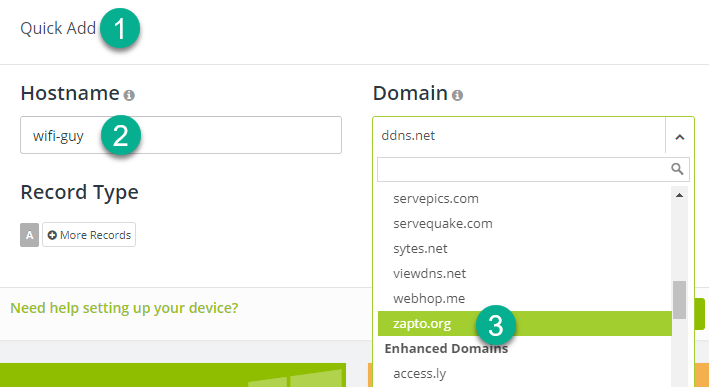
- Go to the “Quick Add” section.
- Create a hostname for yourself.
- Select a free domain.

- Click “Add Hostname.”
Your new domain name or “hostname” has been created.

- Click “Manage it now.”

- This is how you tell the DDNS service where to find your home router by entering its external IP address. You can find it by going to whatsmyip.com from home.

- Your newly created Hostname and its corresponding IP address are displayed. You may want to write this information down or save it to a notepad file.

- Download and install the “Dynamic Update Client.”
The “Update Client” software will be called different things by different DDNS services. The download and install should be a straightforward “next, next, next” process. It will do occasional lookups like you just did on whatsmyip.com and report any changes to your external IP address to the DDNS service.
Note: Your hostname will still work if you don’t install this software but you’ll have to add any changes manually by logging into the website.
Once you download and install the application run it and configure it.

- Click on “Edit” and it will ask you to log in to the service.
- Log in using the DDNS website username and password you created.
Once you’re logged in the software will give you a series of green and red checkmarks to tell you what’s been configured and what needs attention. If you do this from home most of the settings will be configured automatically. Click the “Edit” buttons to make any changes.

- Click “Edit” to make changes to your configuration
- Select the Hostname you want to be forwarded to this computer.
- Click “Save” (Not shown.)
Still, hanging in there? We’re halfway there! Let’s take a look at what you’ve accomplished.
Congratulations! You just set up your own personal domain or hostname on the internet. If you were running a web server at home you could tell your router to forward all traffic on port 80 (The webserver port) to your web server. Typing in the hostname you just created into a web browser from anywhere in the world would pull up your internal website. Awesome right?
OK for the time being let’s stay focused on port 3389 and Remote Desktop.
Now that we have port 3389 traveling across the internet to connect to our router the least we can do is tell it where to go when it gets there right? We do this by creating a port forwarding rule which points port 3389 traffic to a specific IP address on our network.
To prevent that IP from changing and bungling the whole operation that IP should either be static or a DHCP reservation.
In chapter 2 we discussed setting up two different types of IP addresses.
- Static IP addresses that are manually set.
- DHCP IP addresses set automatically by a DHCP server.
A third, very useful type of IP address is a DHCP reservation. It’s kind of a combination of the other two. It’s a static IP address that’s set by DHCP. You tell your DHCP server to reserve an IP address for a specific MAC address. Kind of like reserving a table for yourself at a restaurant.
IP Address: 192.168.1.98 is permanently reserved for MAC Address: 00-21-70-0b-e5-1f
To do this we need to go to our DHCP Server settings.
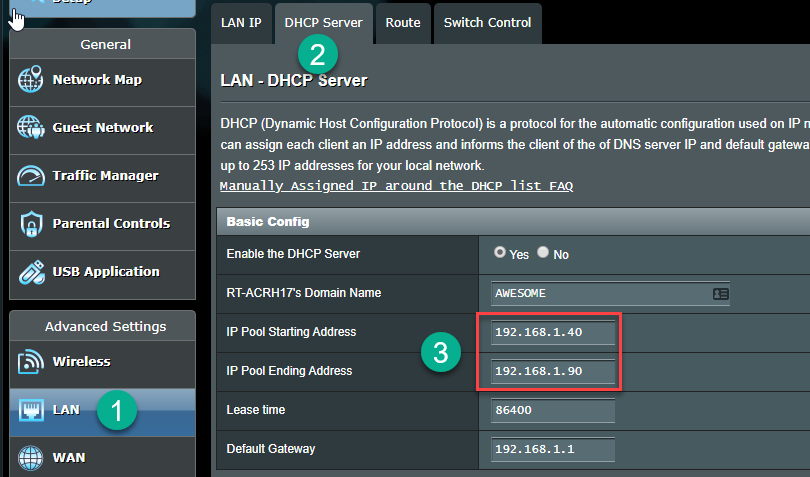
- Go to the LAN section of your wireless router.
- Go to the DHCP section.
- Look at the range of addresses in your DHCP pool. Don’t use one of these for your DHCP reservation.
At the bottom of the DHCP section of your router, there should be a section that allows you to manually assign IP addresses. Many times there will be a drop-down with the computers on your network already listed. Selecting the one you want will automatically fill in your MAC address. If not you’ll have to do it the old fashion way by using the command prompt.

- Add your remote computer’s MAC or select it from the drop-down list.
- Enter an IP address that doesn’t fall within the range of our DHCP pool.
- Click “Add.”
- Hit “Apply” for the router to save the changes.

- Our new reservation has been created.
To test your DHCP reservation you can tell your computer to forget its current IP address and go out and find a new one. This is done with the ipconfig /release and ipconfig /renew commands.

- Entering ipconfig /release at the command prompt causes the computer to forget its IP address. You will also lose your network connection when doing this.
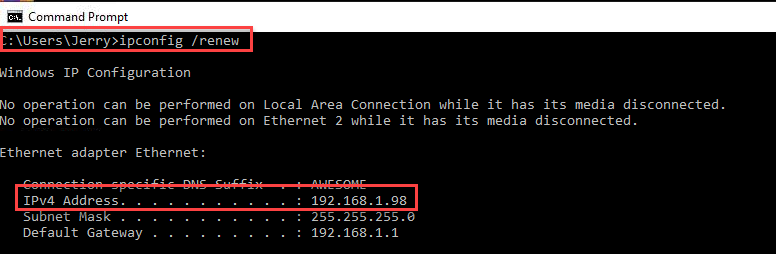
- Entering ipconfig /renew at the command prompt causes the computer to find a new IP address. Here it finds the IP address we set up for it in the DHCP reservation.
So now the Internet can find our external DDNS address of WiFi-guy.zapto.org and our router can find our internal IP address of 192.168.1.98. The only thing left to do now is to register our router with DDNS and add a port forwarding rule.
Once that’s done our router will forward all port 3389 traffic that hits its external interface (Connection to the Internet) to our computer’s internal IP address. Boom!
Log in to your wireless router using its internal IP address and go to the WAN section. You should see sections with the words “Port Forwarding” and “DDNS.”

- Go to your router’s Port Forwarding section.

- Enable Port Forwarding using whatever method the interface allows.

- Go to the DDNS section of your router.
- Login to your DDNS service website in a separate browser window.
Enter the details of your DDNS service account as shown below so it can communicate with your router.
The goal here is to get your router to log in to your DDNS service account so they can talk and authenticate with each other. Your router will need the following settings from your DDNS account:

- Select the name of the DDNS service you’re using from the drop-down menu.
- The hostname you created on the DDNS service website.
- The email address you use to log onto the DDNS service website.
- The password you use to log on.
- Click “Apply.”

- The DDNS service is now registered on your router. They are no longer strangers and should get along swimmingly from here on out.
Time for the final cherry on top – setting up the actual port forwarding (Phew!)
On this router creating a port forwarding entry is called “Adding a Profile.” On your router, it may differ slightly. On all routers, it amounts to the same thing. We go to the Port Forwarding section and add a simple entry containing:
- The port number we’re forwarding. In our case, that’s port 3389.
- The protocol will either be UDP, TCP, or BOTH.
- The IP address of the computer we’re forwarding to. That’s it!

- Click “Add profile.”
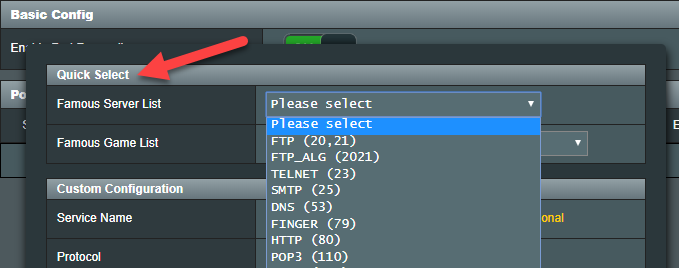
- Most routers offer lists of preset server and game configurations as a convenience. RDP is usually not on these lists so we’ll add it manually.

- The “Service Name” is just a label to help you find it later.
- Most port numbers have different “flavors” or protocols – TCP, UDP, or Both. Port 3389 uses Both.
- Enter a fictitious port number here to obscure the actual port number your using as a security measure. The router will forward your external port to your internal port.
- Enter the actual port number of the game or application you’re trying to connect to. I’ll show you where to get a list of these ports at the end of this section.
- The IP address we are using Remote Desktop to connect to. Remember: this needs to be either a static IP or a DHCP reservation to keep it from changing.
- If you always access from the same location enter that IP here. This is a lot more secure than leaving this field open.
- Click “OK.”

- Our new port forwarding configuration is displayed in the browser.
Earlier I mentioned another program called TightVNC which does the same thing as RDP. TightVNC uses TCP ports 5800, 5500, and 5900. Since they’re all TCP ports we can add them all to the same line and separate them with commas like this.

Our port forwarding settings are complete!
Are we done yet? Yes, we are so let’s test.
Remember we’re not connecting to a computer on our home network. We’re connecting to our home computer from across the Internet. That means instead of entering our home computer’s name or IP address into Remote Desktop we’ll be entering our hostname and domain name.
The DDNS service will forward our request to our home router’s external IP address. The router will see we are trying to connect using the Remote Desktop port number 3389. It will then look at the port forwarding entry we created and forward the request for a connection to port 3389 to our home computer’s IP address. Make sense? If you were a little fuzzy about it before it should all be falling into place for you now.
Let’s go!
The hostname.domain name I created for this demonstration is WiFi-guy.zapto.org.

- If you entered a fictitious port number in step 3 above enter it here using a colon following your hostname.domain name. For example hostname.domain.com:2468
- Click “Connect.”

- So far so good. It’s trying to connect…
- Click “Yes.”

- Enter your Windows computer username and password and you’re in!

- The Remote Desktop session screen appears. You now have total control of your home computer from a remote location!

- To end your Remote Desktop session right-click on the Start button.
- Click on “Shut down or sign out.”
- Clicking on “Disconnect” is like hibernation mode on a local computer It closes the window but your programs are still running. If you log in again everything will be the way you left it.
- Clicking on “Sign Out” is like logging off a local computer. Everything you’re doing will be closed. Make sure to save your document. There is no “Shutdown” command from Remote Desktop.
I’m guessing that in the back of your mind you’ve been thinking to yourself, “How the heck am I supposed to know what ports to use for my other games and programs?” You’ve probably also been wondering, “What if my router’s port forwarding settings look different than the ones in this course?”
Never fear! Portforwarding.com is here!

Portforwarding.com has an extensive list of games, programs, services, and their port numbers. It also has an extremely deep database containing just about every wireless router ever made which includes detailed tutorials on how to configure port forwarding on your particular wireless router. I’m not sure how often it’s updated but it’s a great resource.

Another useful resource is whatsmyip.org. Simply go to this website and the first page will give you the external IP of whatever network you’re on at the time. There are lots of sites that do this. I use this one because the name is so easy to remember.

As useful as port forwarding is it has its disadvantages – serious disadvantages. For one thing, the only security is your password.

Take a look at the “Source IP” field. We leave it blank because we want the convenience of connecting from anywhere we may be. Unfortunately, this means any IP address will do. You are leaving that one port open to the world and the only thing protecting your network is a password and passwords can be cracked.
One thing you can do is disable and enable port forwarding only when you need it. Once your settings are saved you won’t have to redo them every time you re-enable port forwarding. Once port forwarding is disabled your router will no longer be “listening” on that port no one will be able to connect even if they have the password.
You can do this by using Secure Remote Access to your router. Most routers have this feature. It allows you to log on to your wireless router from a remote location and turn port forwarding on when you need it and back off when you don’t. Your administrative connection to your router when accessing with the HTTPS port is protected by TSL encryption which is a more modern form of SSL encryption.

You should be able to find the remote access setting in the Administration section of your wireless router. The HTTPS access port on my router is set to 8448. By entering https://Wi-Figuy.zapto.org:8448 I can access my router’s login page, log in, and temporarily change my port forwarding settings or any other settings I choose.

- Enter your DDNS hostname and domain name followed by a colon and the remote access port (:8448) into a browser. You can also use your router’s external IP address followed by “:8448” if you happen to remember it and it hasn’t changed.

- Notice the little lock icon and the “HTTPS” before the web address. This should appear automatically and means the connection to your router is encrypted.

- Once you’re logged on to your wireless router you can go to the WAN section and enable or disable port forwarding as you chose.
This is sort of like arming your home’s security system when you leave the house and disarming it when you return. It’s not a perfect system but it can help provide a little peace of mind.
Port forwarding is widely used by many web service companies and game servers but they are usually protected by sophisticated firewalls. In my opinion port forwarding, it’s best left to the pros. Especially when there’s more than one way to skin a cat.
This takes us to our next topic – VPN. Also known as Virtual Private Networking.
Your Own Virtual Private Network
Not only is a VPN more secure than port forwarding it’s easier to set up. Sorry if that makes you feel like I dragged you through all that port forwarding mess for nothing but your grasp of the concepts in the port forwarding section will make setting up a VPN seem like a piece of cake. The DDNS hostname and domain name we created for port forwarding can also be used for our VPN.
Here is how VPN differs from port forwarding.
- Port forwarding provides an unencrypted “pinhole” peek into our home network through a single port.
- VPN creates a secure, encrypted tunnel through the Internet which virtually makes the remote computer part of our home network.
The big advantage of VPN access is security. Not only is your connection encrypted but that encrypted data is hidden within a secure VPN tunnel which provides its own set of challenges for would-be hackers.
- With port forwarding, we send a connection request on a specific port to our home router and then forwarded that request to a specific IP address on our network.
- With VPN we’ll be configuring our home router as a VPN server which allows special network protocols to authenticate and pass to our network.
These protocols allow a secure, encrypted connection to launch from a remote computer, tunnel through the internet, authenticate with our home router and pass through to our home network. Shazzam!
The result is much like a direct cable connection to our home network from a remote computer. Instead of being made of physical cabling, it’s a “virtual” connection made of secure, encrypted protocols.

We’ll be using the same DDNS service we used with port forwarding for our VPN.
To set up and establish a VPN connection on our home network:
- A VPN server will be set up on our home router with a username and password.
- A VPN client will be set up on the remote computer pointed at our home router.
- The username and password will be entered into the remote computer’s VPN client.
- That request will follow the DDNS service to our home router/VPN server.
- If the username and password are correct our remote computer is welcomed as a full-fledged member of our home network.
- The remote computer receives a new IP address on our home network in addition to the one it already has on its remote network.
The first step is to configure our router as a VPN server.
Before we do that we have to tell the router to allow the protocols that make VPN work to flow through it. This is known as “VPN Passthrough.” When shopping for wireless routers with the possibility of setting up a VPN in mind “VPN Passthrough” is a keyword you want to look out for. It’s a good indication the router supports VPN connections.

- Go to the WAN section of your router.
- Find the section labeled “VPN Passthrough” or “NAT Passthrough.”
- Enable it or enable each of the individual protocols.
- Hit “Apply.”
Next, find the VPN section of your wireless router. We are setting up a VPN server, not a VPN client. A VPN client is a configuration you can put on your wireless router to use a service you purchase to cover your tracks on the Internet. That’s an option I may or may not discuss later. For now, let’s focus on setting up a VPN Server.
This particular router, like many other routers that support VPN, supports different flavors of VPN. PPTP works with the VPN client used by Microsoft Windows. This makes PPTP a convenient choice. OpenVPN is a different type of VPN Server that uses a special configuration file and an OpenVPN client you can download and install on remote computers.
We’ll look at PPTP first:

- Go to the VPN section of your wireless router.
- Enable the PPTP VPN server on your router.
- Select “PPTP.”
As I mentioned earlier the remote computer will be given an IP address from our home network in addition to the IP from its remote network. This IP address does not come from the same pool of DHCP addresses our other computers use. We have to set up a special DHCP pool for our VPN.
Many times this is done automatically as a convenience when you enable the VPN server. Still, we want to check to make sure. Look for an “Advanced Settings” button or tab in the VPN section you’re in.
On my router it looks like this:

- Use the drop-down box to toggle from “General” settings to “Advanced settings.” The interface will change to display the advanced options for your VPN server. All we’re concerned about here is the DHCP pool.
Look for the words “DHCP pool” or “Client IP addresses.”

- A DHCP pool with 10 IP addresses has been automatically created for us.
Believe it or not, we’re almost done with the VPN server setup! All we have to do now is create a username and password. This username and password will be entered into the VPN client when we connect to the VPN.

- Click “Add.”
- Enter a username and…
- Enter a password.
- Hit “Apply.”

- Our VPN credentials have been created. The current status is “Disconnected.”
That’s it. Our VPN server setup is complete! Now it’s time to set up a client and test our connection. In this case, we’ll be using the VPN client connection in Microsoft Windows. You can also download VPN clients for other devices such as phones and tablets but your success with these may vary.
Setting up a VPN PPTP client connection in Microsoft Windows 10 is easy:

- Enter VPN in the search field.

- Select either “VPN settings” or “Add a VPN connection” from the pop-up menu.

- Click “Add a VPN connection.”

- Select “Windows (built-in)” in the first dropdown.
- Name the connection anything you want.
- Enter your DDNS service hostname and the domain name or your router’s external IP address if you know it. This may need to be changed later.
- Select “Point to Point Tunneling Protocol (PPTP).”
- The type of authentication we’ll be using is “User name and password.”
- Enter the username you entered in the username and password section of your router.
- Enter the password you entered in the username and password section of your router.
- Select “Save” to save your configuration.
A new connection has been added to your list of VPN connections.

- Click “Connect.” No need to enter your username and password because they’ve already been saved.

- If all goes well the status should quickly change to “Connected.” If not you’ll have to retrace your steps to see what went wrong. Sorry. Simply use the “Disconnect” button to disconnect.
As I mentioned earlier your remote (Client) computer will have two IP addresses. One from the network it’s physically connected to and a VPN IP from the special VPN DHCP pool we created.
We can check this by doing an ipconfig /all at the command prompt.
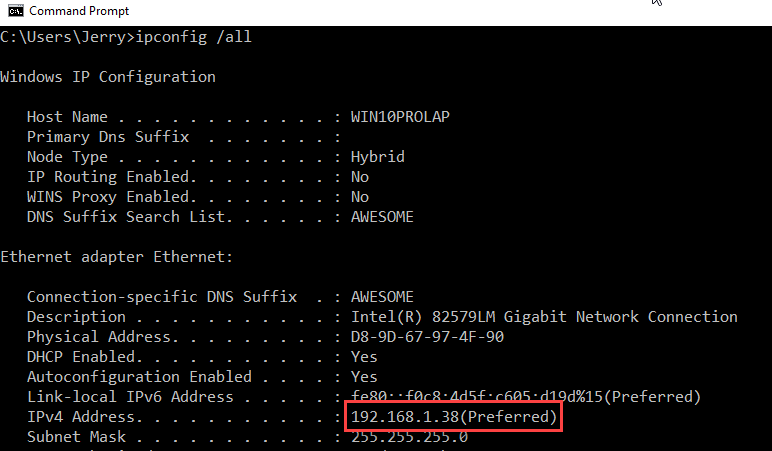
- The “Ethernet adapter Ethernet” shows the remote computer’s IP address on the network it’s physically connected to.

- The “PPP adapter” is the VPN adapter. Notice this IP is in the range of the special DHCP pool we created for our VPN server. (192.168.1.190-199)
We can find further evidence of our VPN connection in our network adapter settings in Network and Sharing Center. (Remember that?)

- Copy and paste [ Control Panel\All Control Panel Items\Network and Sharing Center ]. into a Windows Explorer window without the brackets. You should see a PPTP connection listed. That’s your VPN connection. Right-click to check its properties.
That’s it! You now can create a very secure, encrypted connection to your home network from just about anywhere. Make sure you delete your VPN client settings from any computer that doesn’t belong to you to prevent strangers from inadvertently gaining access.
If you’re using a personal laptop that is a member of your home workgroup and it’s set up to access shares on your other home network, print to printers and access your NAS you should be able to do the very same things from whatever coffee shop, hotel or bar you may be sitting at!
If you’re doing this from someone else’s computer or a work computer you’ll probably have difficulty because that computer may be on a domain or a different workgroup. It may have other security restrictions as well. Some corporations and campuses probably won’t appreciate you creating VPN clients on their computers to access external networks. It’s always best to ask first or, better yet, use your personal computer and devices to access your home network.
Well, that’s it for PPTP. Now let’s look at OpenVPN.
OpenVPN is a stable, extremely secure, open-source network protocol that offers up to 2048 bit encryption. If you own an Asus or Netgear router that supports OpenVPN or own a router that’s been flashed to DD-WRT you’ll find it’s also extremely easy to set up.
Setting up an OpenVPN server on our wireless router is almost identical to PPTP except we use a special configuration file (client.opvn) to export settings from our router to the client software on our remote computer. All your settings, passwords, and encryption keys are hidden in one magic file you can take with you wherever you go.
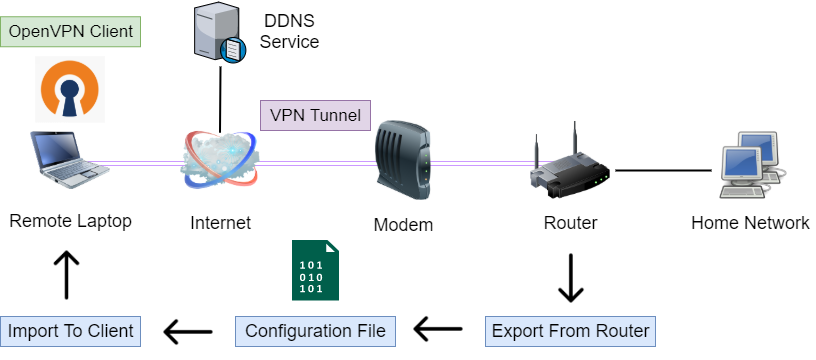
The configuration file also includes our DDNS settings so it’s important to make sure we set up DDNS on the router before exporting the configuration file. If we don’t our remote computer won’t have the hostname.domain name information it needs to find our home router.
For the sake of brevity, I’m going to skip the whole DDNS and PPTP setup since we’ve covered that already.
Let’s get right into configuring our home router as an OpenVPN server. Assuming NAT Passthrough and DDNS have already been set up as we did with PPTP let’s go to the VPN Server section of our router.
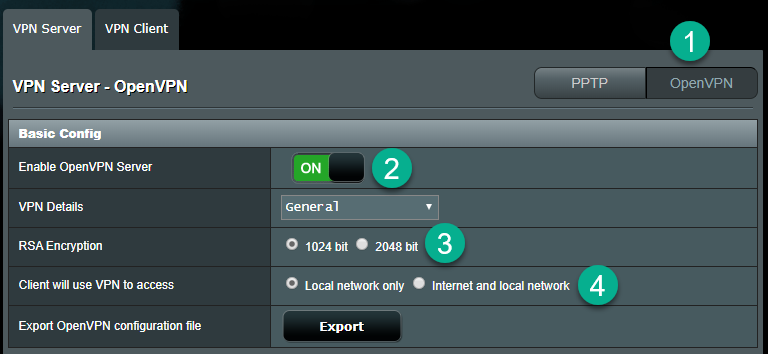
- In the VPN server section select OpenVPN.
- Enable OpenVPN server.
- Select your encryption. Hint: 2048 bit is stronger than 1024 bit.
- Select “Local network only” if you only want to access the devices on your home network. Select “Internet and local network” if you want to use your home network’s Internet connection to access the Internet.
Create a username and password for our new OpenVPN connection.

- Enter a username
- Enter a password.
- Click “Add.”
- Hit “Apply” or “Save” to save the configuration.
OpenVPN has been configured.
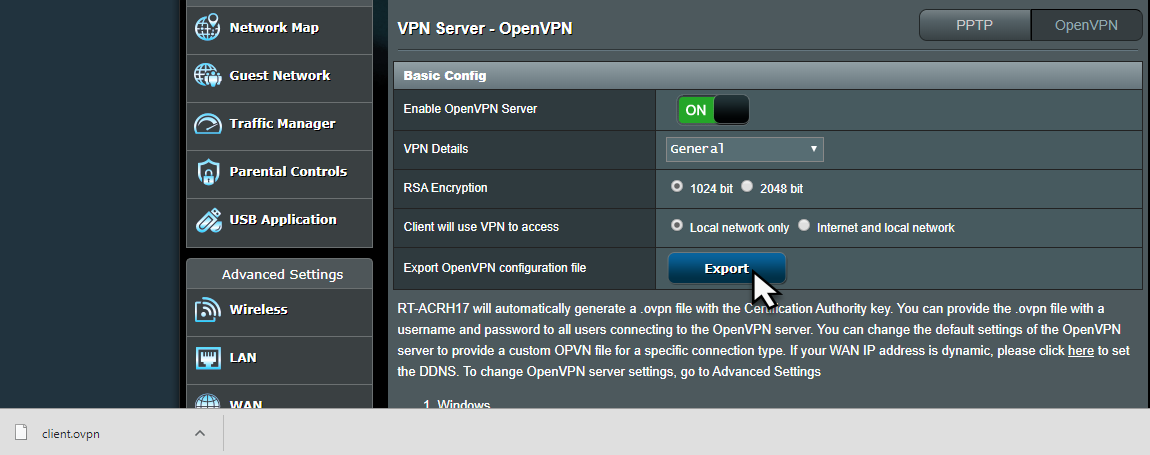
- Click “Export” to export the configuration file.
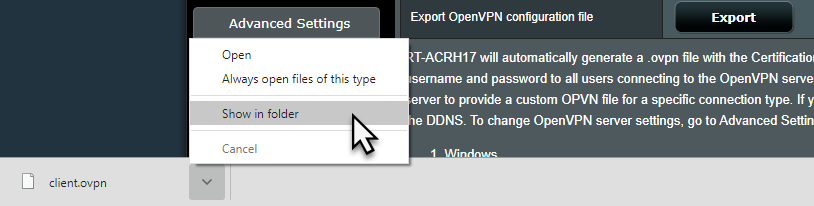
- Save the “client.opvn” file from your router to your computer’s file system.

- Make note of where you save the “client.opvn” file. You’ll need to return here to retrieve it later. You can either import it from here or save it to a flash drive if you’ll be installing the client software on another computer
Go to openvpn.net to download the client installation file to your remote computer.


- Run the installation file and accept the defaults unless you have a specific reason not to.

- Once it’s installed you can start the OpenVPN client service by clicking on its desktop icon or going to the OpenVPN icon in the start menu.

- Uh-oh! If you get a message that looks like an error code it’s simply telling you to import the configuration file.

- To the left of the time and date in the bottom right corner of your screen, you’ll see a small up arrow. Click on it and a pop-up with tiny icons appears.
- Right-click on the OpenVPN icon (Tiny monitor with a lock on it.)
- Select “Import file…”

- Browse to the place you saved your “client.opvn” file.
- Select the file.
- Click “Open.”

- You should get a message saying the file was imported successfully. Your OpenVPN client is now ready to use.

- Go back to the little up arrow by the date and time.
- Right-click on the OpenVPN icon
- Select “Connect.”

- Enter the username and password you set up on your wireless router.
- Click “OK” to connect.

- A status box appears with log entries that are somewhat difficult to read. The words “Successful” and “Completed” indicate you’ve established a connection.

- The OpenVPN icon is green and indicates it’s connected. The username and password section on our routers VPN section shows it’s “Connected.” Congrats!

- To disconnect simply right-click on the OpenVPN icon. Select “Exit” to close the OpenVPN client.

- If you’re curious you can do a quick ipconfig /all while connected to the VPN. You’ll see a weird IP address and DHCP address you don’t recognize. Don’t worry about it. This is configured automatically by the OpenVPN server.

- You can also go to Network Connections to see what’s going on over there. Notice “No Network Access” and “0 Packets Received?” Normally this would be a concern but it’s not in this case. Can you guess why?

- The reason we have no Internet access is we set our client settings to “Local network only.” If we selected “Internet and local network” we would see Internet activity.

- One final detail. The client.opvn file is simply a text file. When you open it in notepad what’s the first thing you see? The DDNS hostname.domain we set up. This is how the client on the remote computer can find your home router.
At this point, your mind should be boggling at how much you’ve learned about VPN, OpenVPN, and port forwarding. Most people have no clue about this stuff. Now you know how simple it is. You’ll find the understanding you gained from this chapter will come in handy if you want to set up remote access to things like game servers, web servers, your NAS, and even IP cameras.
Yes, there is a section on IP cameras coming up.