Troubleshooting Home Network Problems
If you like patting yourself on the back after solving a problem, you’ll enjoy troubleshooting home network problems. Troubleshooting is a logical process of elimination used to separate what is working from what is not working. Once you know what is NOT working you can focus your efforts on that issue instead of trying to “fix everything.”
You can save yourself a ton of time, money, and frustration by learning the basic home network troubleshooting steps covered in this article.

First, we’ll use the tools we already discussed in the Wired Home Networking and Wireless Home Networking sections to see the various network connection states and their causes. Recognizing these states and knowing what to do about them will help you diagnose most networking problems quickly.
No time to read right now? Download this article in convenient PDF format.

The tools we’ll use are the Network Connections sheet in Windows, link lights, and the ipconfig and ping commands at the Command line.
Find Your Network Connections
To get to Network Connections you can go through Network and Sharing Center as I did in Chapter 1 or simply type in ncpa.cpl in the search bar in Windows 10 or the Run box in Windows 7. You’re provided with a list of all the connections to your computer.

Here you’ll find info on your Ethernet, WiFi, Bluetooth, VPN, and virtual connections. The only ones we’re concerned about in this chapter are the Ethernet and WiFi connections.

- The connection is healthy and the cable is plugged in at both ends.
- The cable is bad or unplugged. Replace or re-seat the cable.
- Note: Sometimes you’ll see “Identifying” or a little yellow triangle here. This is normal and usually means the computer is picking up a new IP address. If this state flickers on and off by itself, it points to a loose connection or bad cable.

- A network adapter can be either disabled or enabled. This is not the same as being disconnected. It means the adapter is turned off. When you see this on a WiFi adapter it usually means the device is in Airplane Mode. Older laptops have a physical switch or function key combination you can use to toggle the adapter on and off.
- You can enable or disable it by right-clicking on the adapter and selecting Enable or Disable or toggling between WiFi and Airplane mode with a WiFi adapter.

- WiFi is disconnected.
- You can connect or disconnect your WiFi adapter by right-clicking and selecting Connect/Disconnect.

To dig deeper into your IP address settings double click on an adapter. This takes you to the Ethernet Status sheet :
- The Activity section shows data activity passing through your adapter. The Sent and Received totals should always be going up. If not there’s a connection problem.
- The Connection section tells you whether you have an internet connection or not.
- Clicking on the Details button brings up the Network Connection Details sheet.
- The Network Connection Sheet is a convenient way to get the same details you would get from the ipconfig /all command without going to the command prompt.

- Clicking on Properties on the Ethernet Status sheet brings us to the Ethernet Properties sheet.
- Click on TCP/IPV4 and select Properties to get to the IPV4 sheet below:

Usually, both radio buttons will be on “Obtain automatically.” This means the IP address and DNS servers are set by the DHCP server. The IP address fields will be blank unless they have been set manually. When the IP addresses are set manually it overrides DHCP. If an IP address is entered incorrectly here it can take a computer off the network.

If you go to the command prompt on this computer and enter ipconfig /all the DHCP Enabled setting will say “Yes.” If we manually enter an IP address the DHCP Enabled setting will say “No” and the IP Address we entered will appear next to IPv4 Address. Go ahead and try this on your machine if you want to. It won’t break anything I promise. As long as you manually remove your IP address it will go back to the same DHCP settings you started with.
Note: When switching back and forth between DHCP and static IP addresses you may need to either restart your computer or use the ipconfig release and renew commands.
- Ipconfig /release – This releases your computer’s claim to the IP address it has at the moment.
- Ipconfig /renew – This brings the IP address back or causes the adapter to pick up a fresh one.
I recommend you play with these settings for a little while to get a feel for them. There is nothing more frustrating than being in the middle of a troubleshooting session and being confused by the output you receive from these commands.

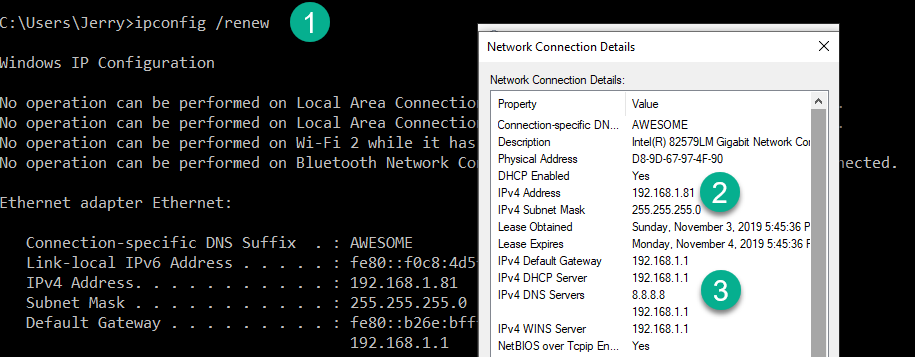
- Ipconfig /release typed into the command prompt.
- A new weird–looking IP address has replaced the old one!
- The Gateway and DNS information needed to access the Internet is gone.
I entered ipconfig /release and look what happened. The Gateway and DNS settings are gone, DHCP is still enabled and the IP address has changed from 192.168.1.81 to 169.254.209.157. What the heck? An IP address that begins with 169.254 is called an “APIPA” address. A computer automatically assigns itself an IP address beginning with 169.254 if it cannot contact a DHCP server. In this case, the computer’s DHCP IP was released so the computer configured itself with its own IP address in the original IPs absence. It may seem weird but it’s by design.
In theory, an APIPA (Automatic Private IP Addressing) address allows computers on a network to communicate with each other even if the “Internet is down.” It actually works but no one cares because whenever the “Internet is down” everyone just gets up and walks away from their computer.
Whenever you see an IP address that begins with “169.254” you know it’s an APIPA address and there is a DHCP issue. The cable probably looks like it’s properly plugged into a switch or wall jack but the connection to the DHCP (Your wireless router) is lost.
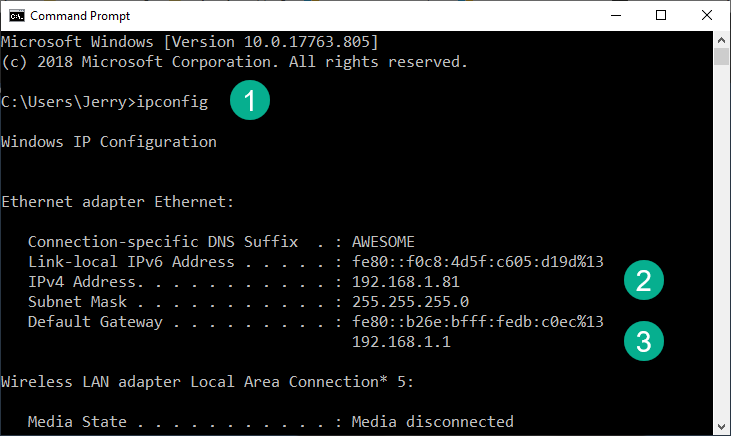
- Ipconfig /renew is typed into the command prompt.
- The original DHCP address has been returned.
- The Gateway and DNS settings needed to access the Internet have returned.
After entering ipconfig /renew the IP address is restored or replaced with a new one and everything happily returns to its original state. Everyone back to work – or your respective YouTube videos.
You’ll see a lot of 169.254.x.x IP addresses when troubleshooting home network issues. It usually means the same thing. The computer has a physical connection but it’s not reaching a DHCP server (Wireless router). The DHCP server itself could be down or something in the cabling path to the DHCP server has an issue.
Many times it’s a connection to a switch or wall jack (In an office.) Try reseating (unplugging and plugging it back in.) or replacing the cable. Doing a quick check of the link light activity on the computer’s network card, any switches in between the computer and DHCP server and on the router itself will usually lead to the culprit.
Wait, did I say “link light activity?” Sounds like I dropped another technical term on you without a proper explanation.
Link Lights and Physical Connections
Even the cleverest of Network Engineers have spent hours troubleshooting network issues using the methods I described above and other sophisticated tools when they could have saved themselves hours of wasted time and frustration by simply checking a physical connection or link light.
You’ll find link lights where ever you find a network connection. You’ll find them on NIC cards, switches, modems, and wireless routers. They’re usually green, yellow, or blue. If you see them and they’re blinking away like mad that’s a good thing. A steady pulse or a light that seems stuck could indicate a problem. If you don’t see them at all – that’s bad.

Whenever you get a new wireless router or modem it’s a good idea to familiarize yourself with what the individual lights mean. A few minutes of looking at the documentation now could make your next troubleshooting session a breeze.
You never think someone is going to squeeze themselves behind a desk looking for something and knock a cable loose or a pet is going to chew on a network wire until it fails. These things happen. Well over half of internet connection issues are caused by a physical connection issue or a configuration issue in the home and not the ISP.
Luckily identifying physical issues is easy. Sometimes it can be a pain but for the most part, it’s easy – even if you have never seen a command prompt or the Network Configuration sheet on your computer.
What Has Changed?
Let’s consider the following scenario. You have a desktop computer connected to a switch which is in turn connected to your wireless router. Your printer is also connected to that switch and everything has worked flawlessly for years. All these devices have been sitting in the same place for so long they’re beginning to gather dust. You decide it’s time to clean up some of that dust and hire a carpet cleaner. Later that evening you try to access your favorite website and you get the following:

Uh oh! What do you do now? Up to this point, you may know nothing about command prompts or network troubleshooting. Everything worked so well for so long that you never thought to even look into it. Now you can’t even look up the error because…well, you have no Internet!
You could always call your ISP but if you do you’ll probably spend a long time on hold becoming more and more frustrated. Then when someone finally picks up they’ll probably just do some tests and say everything looks fine on their end. Then they’ll say “If you like we can schedule a tech to come out and take a look later this week. What time would be best for you?” You don’t want to go without the Internet for days so what can you do?
The best thing to do in a situation like this is to remain calm and think to yourself “What has changed?” What has changed between the last time everything worked and the first time it didn’t work? As you sit there rewinding the events of the day in your mind you take a deep breath and the smell of carpet cleaning chemicals enters your nostrils. It hits you! Of course, that’s it!
The change you made was you had the carpet cleaned. You cleaned out all the dust behind your computer, tried to tidy it up a bit, and then the carpet cleaner came over. You specifically asked him to get under your desk and around the computer.
The cables behind your computer look like a rat’s nest. Everything is so tangled up it’s hard to tell what goes to what. You slowly remove the mouse and keyboard cables to get them out of the way. You try to separate the network cables from the power cables and then you see it. The power adapter to the switch that connects your computer to the router is hanging loose and the lights on the switch are off. That must be it!
You didn’t even notice it. All this time those blinking lights on the switch meant nothing to you so your mind just filtered them out. You excitedly plug the power adapter back in and the lights immediately blink rapidly. You also notice some more lights blinking at the end of the cable that plugs into the back of your computer. Out of pure curiosity, you trace the “feed” cable from the switch back to the wireless router and notice the link light to that cable is happily blinking away as well.
You sit back down at your desk and refresh your browser. As if by magic your website has returned! You feel relieved and pat yourself on the back. You can take pride in the fact that you stayed calm and saved yourself considerable time, frustration, and possibly even money by simply spending a few minutes looking for some blinking lights.
Ping First Ask Questions Later
Seriously, calling your ISP and asking for their help should be seen as a last resort. I used to do customer support for an ISP and the prevailing attitude among my coworkers and I was it’s the customers’ fault and it’s our job to prove it. That may seem callous but many times it was true. Of course, it wasn’t always but the vast majority of the time a customer’s Internet issue was due to an equipment or configuration issue in their home that we had no control over.
If something did go down it was usually in the form of an area outage due to construction, a lightning strike, or some natural disaster. Any interruption in service would set off a series of alarms which would alert a Tech who would dispatch another Tech to go out and fix it. So if you call an ISP about an actual outage there’s a good chance they already know about it and are trying to fix it.
I’m not saying ISPs never screw up because they do but at this point, your time is better served on things you have control over like the equipment and configuration in your home. Then once you’ve eliminated that possibility it’s time to call the ISP. When they realize they’re on the phone with someone who knows a thing or two about network troubleshooting they’ll respect that and will be less likely to give you the runaround
Meet PING – Your New Best Friend
The ping command is the electronic equivalent of poking someone in the ribs to make sure they’re awake. A ping sends 4 packets to a destination IP address. If the destination device is live (Turned on. ) it will send 4 replies back to the sending device along with information on round trip times and any lost or delayed packets.
As you gain experience setting up and troubleshooting networks the ping command will become your best friend. The ping and ipconfig commands are the fastest, easiest ways to familiarize yourself with what is going on with your computer and your network.
- Type ipconfig
- Your IP Address
- Your Default Gateway address
When troubleshooting an Internet connection issue the best thing to ping is your wireless router. Your wireless router is your home network’s gateway to the Internet so you want to use the ipconfig command to find your gateway address.

For more details about your network connection, you can use ipconfig /all instead of ipconfig.

- Ping your Default Gateway address with is 192.168.1.1
- Four replies with no packet loss is a successful ping. You have a good Ethernet connection to the router.

- Ping 192.168.1.1.
- “Request timed out” means you probably have a cable connection but the router is not powered on.

- Before pinging the Default Gateway I disabled the Ethernet adapter and connected to the WiFi.
- The Ethernet Adapter doesn’t even show up on the list.
- Connection settings show up on the WiFi adapter just like they would on the Ethernet adapter.

- Before running ipconfig I disconnected the cable from the Ethernet port.
- The response is self-explanatory.
DNS Resolution
Your home network troubleshooting skills require understanding how DNS impacts daily web surfing. No DNS no web surfing. As we learned earlier DNS resolves domain names that are easily remembered by humans to IP addresses that are easier for computers to understand.
On a home network, DNS resolution is usually done by your ISP. DNS requests are sent from your browser to your wireless router’s gateway address. From there they are forwarded to a DNS server on the Internet. Usually, DNS servers are provided by your ISP but you can also specify your DNS servers (Such as Google DNS – 8.8.8.8) on the Network Property sheet.

Sometimes all your internal connections will be great but you can’t open up a web page. This can happen because your modem is off, DNS issues with your ISP, or DNS being misconfigured on individual computers. It can even be caused by malware that “redirects” your DNS requests to a bogus server.
You can quickly test your DNS resolution with some simple ping commands.

First make sure you have a connection to the Internet by pinging Googles DNS server IP address: 8.8.8.8.

If that’s successful test DNS resolution by ping an internet domain name preceded by www. For example ping Googles website at www.google.com. If you get successful pings back that means DNS successfully resolved www.google.com with the correct IP address. If not you may have an issue with your ISP or the DNS settings on your router or individual computers.
If this issue is happening to all the devices on your network try power cycling your modem and router. If you still can’t resolve DNS it may be time to give in and call your ISP. This can also be caused by malware in your browser. A good program to clean up malware issues in your browser is Malwarebytes.
Persistent Ping Pays Off
Another very useful tool is the persistent ping or ping -t. What “-t” has to do with the word “persistent” I’ll never know. Instead of sending just 4 packets ping -t sends a constant stream of packets to a device until you tell it to stop. This is useful when you want to see the changing status of a connection while testing or rearranging cable connections. It can also be used to test your WiFi signal and the general health of your network hardware. Use Ctrl + C to stop.

Here I ran a persistent ping (ping 192.168.1.1 -t) on my gateway address, unplugged the Ethernet cable, and plugged it in again. The “General Failure” message means you have no network connection at all.
If you get “Request timed out” that means you have a good cable connection but the device you’re pinging is down or unreachable. Check to make sure the device your pinging is turned on and the cable is connected when getting these messages from a persistent ping.
A persistent ping is also a useful tool to identify bad connections and faulty hardware. If you start seeing times like this (See below) on a wireless connection it means you have network congestion or network latency (Slow down.)
Reply from 192.168.1.1: bytes=32 time<192ms TTL=64
Reply from 192.168.1.1: bytes=32 time<219ms TTL=64
Reply from 192.168.1.1: bytes=32 time<91ms TTL=64
Reply from 192.168.1.1: bytes=32 time<154ms TTL=64
- There could be too many other devices on that band, channel, or on the WiFi in general.
- There may be some sort of interference or physical device in your home blocking the signal.
- You could be too far from the wireless router and the signal is beginning to weaken.
On a wired network, the above readings usually point toward flakey hardware.
- You could have a bad NIC (Network card),
- You could have a bad cable.
- Your router or modem could be going bad.
If you have the same results from pinging the same device from multiple devices that point to an issue with the device you’re pinging. This command can also help isolate a bad cable. Some cables go through a lot of abuse and need to be changed from time to time.
Things To Check Before Calling The Dreaded ISP
- When troubleshooting your Internet connection the first thing you want to do is see if you have an internet signal coming into your home. You can check this by connecting one end of an Ethernet cable to a laptop and the other to the Ethernet port on your modem. Do an IP release and renew as we described earlier to pick up an IP from your provider, open a web browser to see if you get a webpage. If you do go to speedtest.net and run a speed test. If all this checks out you know the issue, not your ISP.
- Is the problem with your wireless router? Reconnect your modem to your router and do the same thing we did with the modem including the ipconfig /release and renew. If necessary, power cycle your router just like you did your modem. If that all checks out you know the issue is probably somewhere else in your home. Note: you want to make sure your modem and router are plugged into surge protectors and not directly into the wall. Small fluctuations in power can cause them to lock up and possibly even damage them permanently.

- Is the issue with just one device or all devices? If you can isolate the issue to a single device, you can focus your troubleshooting efforts on one thing. Try pinging your wireless router and accessing the same site from all devices to see which ones are having problems.

- Check the link lights on both the device and the router. Try “re-seating” them by unplugging them and snapping them back into place. On a laptop or desktop, it’s possible the device has fallen off the network or the network card drivers have been updated. You can pick up a new IP or reinitialize your network card drivers with a simple reboot.

- If you’re using an external switch check the link lights on the switch and power cycle it. Make sure it’s plugged into a power strip with surge protection and not directly into the wall. Slight power fluctuations (Brownouts) can cause these devices to lock up temporarily and sometimes permanently without proper surge protection.

- Is the issue with WiFi, Ethernet, or both? Check to make sure you’re not in airplane mode and that your WiFi adapter is not disabled. Check for the red X or yellow triangle on the network icon next to your clock.

If these troubleshooting steps yield no results it may be time to bite the bullet and call your ISP.
Browser Issues
If you’re having an issue loading a certain website, try another browser. If that doesn’t work, try another computer. If you’re having an issue with one website on all your computers that website may be down or having issues. Time to wait it out or try another website. If you can access that website in another browser or on another computer, it’s time to look at the browser on your ailing computer.
Web browsers pick up a lot of junk. When this junk accumulates your browser can get “stuck.” This usually shows up in the form of a spinning wheel on the tab of the website you trying to open. When this happens it’s time to tear yourself away from the other websites you have saved in open tabs by closing them. Having a lot of tabs open can quickly devour your available memory and cause your browser to slow down to a crawl and even lock up. If you need to have more tabs open than your computer can handle it may be time to upgrade your computer’s memory.
Another solution is to clean the junk out of your browser. This junk is commonly called “cache.” Browser cache is designed to help with slow internet connections by saving website images and pages on your hard drive instead of forcing your computer to go back out onto the Internet and retrieve them every time you want to revisit that page. Ironically saving all these files on your computer ends up slowing your browser down anyway. With today’s Internet speeds you could probably turn caching off altogether and not notice a difference in webpage loading times.
Cookies are tiny files that some websites drop on your computer to save preferences and password information pertaining to that site as a convenience. Cookies can also be used to track you and send you all those annoying ads. Caution: if you delete these you may also be deleting your passwords and other customizations to certain web pages.
The location to clear your cache and cookies is different in each browser.

- Internet Explorer: Click on the gear icon in the upper right-hand corner. Click on Internet Options from the menu and go to the General tab. You can also use the Settings button to change how Internet Explorer handles your cache files.
- Edge: Click on the 3 horizontal dots in the upper right-hand corner. Click on History and then “clear history.”

- Chrome: Click on the 3 vertical dots in the upper right corner. Go to Settings. Scroll down to Advanced and select “Clear browsing data.”
- Firefox: Click on the 3 horizontal bars in the upper right-hand corner. Go to Options and then Privacy and Security. Scroll down and click on History.
If this gets too tedious you can use a great free tool called “CCLeaner” to clean the junk out of all your browsers and the rest of your computer simultaneously. You can also download a free trial of Malwarebytes to scan and remove malware from your browsers which may cause problems with pop-ups, redirects, and unwanted ads.
As a final word of caution be very careful about where you go to download files. If you need to download software make sure it’s direct from the software manufacturer’s website and not some “Mega Download” site. Many download sites drop nasty little scripts, programs, and toolbars on your computer which cause pop-ups as well as lock-ups in your browsers.
Driver Issues
Drivers are simply pieces of software that allow hardware devices to work with the Operating System. For example, a Windows 10 Wireless network card driver allows a Wireless network adapter to communicate with the Windows 10 Operating system.
Drivers usually work pretty seamlessly and in the background. Modern Operating Systems do a good job of identifying and configuring them with little human intervention. There are times, though, when they simply stop working. The simple way around this is to simply uninstall and reinstall them. This is done in Device Manager.

- To get to Device Manager type in devmgmt.msc in the run box in Windows 7.
- In Windows 10 type in “device” in the search field and it will pop up in the menu list.

This brings us to Device Manager or Device Mangler as we used to call it back in the days when managing devices was difficult and required a certain amount of skill and patience. Here the Network Adapters section is open. Our focus is on the TRENDnet TEW-808UBM AC1200 Nano USB Adapter.
As the name says this is a USB Adapter so uninstalling and reinstalling this driver is a simple matter of unplugging it and plugging it back in. There will be some dinging noises and the Network Adapter section will close and reopen as it redetects the device and reinstalls the driver. Don’t let this freak you out.
If you want to uninstall and reinstall the Intel Centrino Ultimate N adapter that’s a bit different. The device is built into the motherboard so you can’t remove it. Instead, you right-click on it and select uninstall. Windows 7 may ask if you want to delete the drivers. Always say “NO” otherwise you may find yourself searching the internet to download the drivers again. Not a pleasant task when you have no connection to the Internet to begin with.

- Uninstall driver.
- Scan to re-detect the device ad reinstall the driver.
The device will disappear from the list. Don’t worry we can bring it back with a freshly installed driver by clicking on the little scan button on top to redetect the device and reinstall the driver. Sometimes you’ll have to show Windows you mean business by rebooting the computer instead of clicking on the little scan button. This ensures the registry entries are reset.
I’ve cleared up many network issues by simply uninstalling and reinstalling corrupt network drivers. Just another tool in your tool belt.
Firewall/Antivirus Issues
Sometimes antivirus software can be as bad or worse than the virus itself. Especially the big-name paid-for programs that promise to do everything for you but change the oil in your car. Some of these programs are so resource-intensive that you may find yourself in need of a memory upgrade just to run them.
Fortunately, there are many free programs out there that are just as good and use far fewer resources. The Windows Defender program that comes with Windows 10 may soon put these other programs out of business and should be fine for general web surfing. See Chapter 14 – Antivirus and Internet Security for more on this topic.
Firewalls and Antivirus programs are designed to protect your computer from known threats. They identify threats by comparing the “footprint” of software downloaded to your computer against a database of known threats. Sometimes the world travels too fast for these databases and a new version of the software which used to run just fine suddenly can no longer be found in the database and the AV or firewall will shut it down.
To determine if the issue is your firewall or AV (Which usually has its own built-in firewall.) simply disable it temporarily. Most AV programs can be disabled temporarily with a simple drop-down menu or button. You’ll have to Google your specific brand.

As an example, I use Avast on most of my computers. Disabling it is a simple matter of right-clicking its icon on the system tray and choosing how long your want to turn it off.
Sometimes the AV software or the database can become corrupt and unusable. This often happens when someone believes they are “double protecting” themselves with multiple Antivirus programs. Many times multiple AVs will identify each other as infections and seek to destroy each other. This can wreak havoc on a computer operating system and disable your network connections.
The only fix for this is to uninstall both programs and reinstall the one you want to keep. Sometimes a simple uninstall won’t work and you’ll have to download and use a special removal tool for that software. Download it on another computer to a USB drive and run it from there.
If you’re not using a 3rd party Antivirus/firewall solution you can temporarily turn the Windows 10 firewall off and on again with the following commands at the command prompt. Log into your computer as a local Administrator, open a command prompt and enter:
- netsh advfirewall set allprofiles state off
- netsh advfirewall set allprofiles state on
W-iFi Troubleshooting Checklist
Sometimes when you’ve been troubleshooting network issues for as long as I have you’ll walk into a situation and have a “feel” for what to check first. If not it’s best to follow a system or have a list of things to check so you know you covered all the bases. This list starts with the easiest and fastest things to check first and gradually moves to more difficult and time-consuming steps later.
- Make sure your wireless adapter is enabled and you’re not in airplane mode.

- Check the cables to your modem and router. Make sure you have link lights to all cables.
- Restart the modem.
- Restart the router.
- Check for obstacles near the wireless router or the device you’re connecting to.
- Try moving the device closer to the wireless router.
- Using a program like WiFi Analyser check for nearby wireless routers that are on the same channel as yours. Switch channels if needed.

- If you’re on the 2.4GHz band go to the 5GHz band. It’s faster and less susceptible to inference.
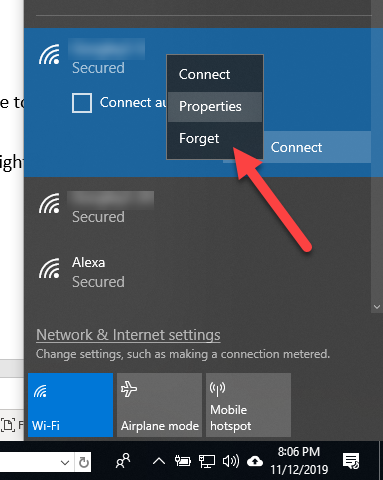
- Use the Connection Manager in Windows and disconnect from your network. Right-click on that network and select “Forget” Re-enter your passphrase and reconnect.
- Reset your WiFi passphrase in the router.

- Go to your connection setting and make sure your IPv4 settings are set to DHCP. Manually entered IP settings can conflict with other devices.

- Update or uninstall and reinstall your wireless adapters drivers.

- Allow any Windows updates to completely download and install. This may mean a reboot.

You may be wondering what Windows Updates have to do with your wireless connection. On the surface, not much but deep down Windows updates can alter the Operating System to the point of not functioning properly until they are completely installed and the system has been restarted. I can’t tell you how many times I’ve seen seemingly unrelated issues fixed by simply allowing Windows updates to completely install.

- I promised you I’d save the best (Most difficult) for last. This step is so involved and so important I had to write a separate section on it. The final step in troubleshooting your wireless network connection is to update the firmware on your router and if necessary reset it to its factory defaults.
Firmware Updates and Resetting Your Router
Some may argue the more you tinker with something the more you’ll mess it up. You’ll be tinkering with your wireless router quite a bit in Part II when we start setting up cool things and adding new capabilities to your home network. There will be times when you forget your admin password and other times when some of your configuration changes may conflict and you can’t backtrack your way out of it. Not to worry. In most cases, these problems can be resolved with a little patience and a paper clip.
Another less drastic troubleshooting tool is the firmware upgrade. Many manufactures add new features to their wireless routers through firmware upgrades. I once purchased a wireless router because I felt it was a great value for a router that supported VPN connections. When I got it home I found the VPN support was not available unless I did a firmware update.
Most wireless routers have an easy-to-follow update utility. You’ll either download the firmware to your computer from the manufacturer’s website and point to that file location from within the web interface or the interface will automatically notify you when an update is available and you simply select “update.” Once the update is complete the router will automatically reboot and your updated features will be available.
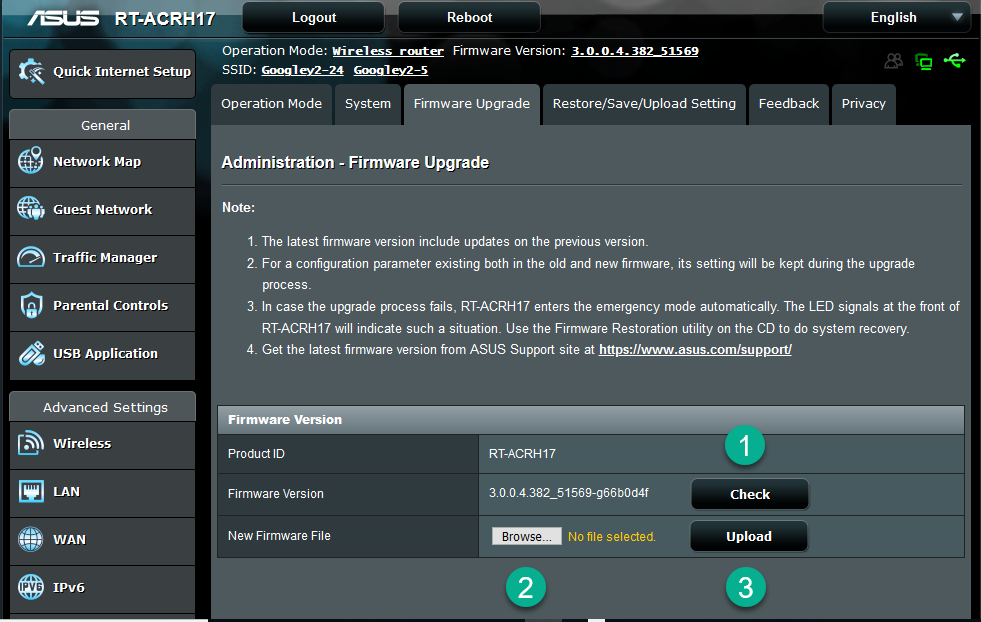
- While in the Administration section of your routers web interface check for current updates and download them.
- Browse to the file.
- Click Upload to update your router.
- Browse to the file.
Many times your router will stop working and simply powering it off and on again will bring it back to life. A slight power surge can throw your router and out of whack and the quick fix is to power cycle it.
Other times the problem is more serious. If the router gets zapped by an electrical surge or gets overwhelmed with traffic it may lock up and become unusable. You may have also lost your admin password to the router. The fix for these problems is the hard reset. A hard reset deletes all the passwords, SSIDs, and other configurations you spent so much time on but it will return it to an operational state. Previous firmware upgrades will remain.
You’ll need to use the router’s default username, password, and IP address to log in. If you saved your configuration file as I described in Chapter 3 should be able to restore it to its previous state in a few minutes.
The procedure to reset a wireless router differs slightly from one manufacturer to another. It goes like this.

- Insert a paper clip into the small hole labeled “Reset” on the back or the bottom of the router and depress the button inside the hole for a few (5-10) seconds.
- The router should reboot itself and you’ll notice the light flickering in unison or some weird fashion.
- When the lights go out remove the paper clip and allow the router to finish booting. It should return to its factory settings.
If the lights blink in a weird manner you’ve never seen before and it restarts itself that means it was probably a successful reset. It’s easy to get this wrong the first time you try it. Don’t be discouraged. Simply try it again and it will eventually come back up and be ready for use.