How To Improve Your Wi-Fi Signal Strength At Home
Intro
Despite all the advancements in Wi-Fi technology, many people still face frustrating Wi-Fi dead zones and slow connections that get in the way of productivity and enjoyment of the technological wonders today’s world has to offer. This article will empower you with practical and effective solutions to boost your Wi-Fi signal.
It’s hard to get by in life with crummy Wi-Fi. This comprehensive guide will give you the basics of improving your Wi-Fi signal strength at home. As you know, in today’s online world, a strong and reliable Wi-Fi signal is important for smooth online experiences, whether it’s for work, entertainment, or staying connected with friends, family, and co-workers.

Choosing the Right Wireless Router
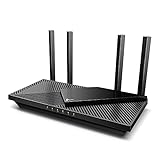
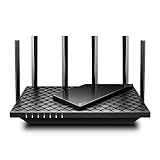
The first, and most obvious, step in making sure you have a strong Wi-Fi signal is to invest in a good to high-quality wireless router that suits your needs. When selecting a router, consider its coverage area, frequency bands, and data transfer speeds. Dual-band routers (2.4 GHz and 5 GHz) are preferable as they offer better performance in different scenarios. Look for a router with multiple antennas and beamforming technology to improve signal distribution and focus on connected devices.
Router Placement Is Important!
Many people treat their wireless routers like an old appliance and try to hide it in a broom closet, garage, or washing machine room. Your wireless router is your central hub of communication with the outside world and should be treated with the respect it deserves.
Placing your router strategically can make a significant difference in signal strength. Avoid hiding the router in cabinets or behind obstacles, as this can obstruct the signal. Instead, position it in a central location, elevated from the ground, and away from large metal objects or electronic devices that might interfere with the signal.
Reduce Interference
Other electronic devices can interfere with your Wi-Fi signal, leading to decreased performance. Keep your router away from devices like cordless phones, microwaves, baby monitors, and Bluetooth gadgets. Additionally, Wi-Fi signals can clash with neighboring networks, so use apps or tools to analyze nearby channels and choose the least congested one.

Wi-Fi Analyzer app. Downloadable from the Microsoft Store.
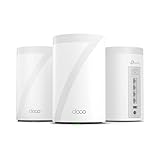
Use Wi-Fi Extenders or Mesh Systems
If certain areas of your home suffer from weak Wi-Fi signals, Wi-Fi extenders or mesh systems can be game-changers. Wi-Fi extenders amplify the existing signal, while mesh systems create a network of nodes that work together to provide seamless coverage throughout your home.
Update Firmware Regularly
Manufacturers often release firmware updates for routers to enhance performance, security, and fix bugs. Make it a habit to check for updates regularly and keep your router’s firmware up to date. This simple step can significantly improve your Wi-Fi experience.
Secure Your Network
Securing your Wi-Fi network not only protects your data but also ensures that unauthorized users don’t consume your bandwidth, causing slower speeds. Use strong passwords with a combination of letters, numbers, and special characters. Enable WPA2 or WPA3 encryption for the highest level of security.
- Change Default Credentials: One of the most critical steps in securing your network is changing the default username and password for your Wi-Fi router. Default credentials are often publicly available, making it easier for hackers to gain unauthorized access. Choose strong, unique passwords that combine letters, numbers, and special characters.
- Use Strong Encryption: Enable WPA2 or WPA3 encryption for your Wi-Fi network. Encryption scrambles the data transmitted over your network, making it unreadable to unauthorized users. Avoid using WEP (Wired Equivalent Privacy) as it is outdated and less secure.
- Disable WPS: Wi-Fi Protected Setup (WPS) is a convenience feature that simplifies the process of connecting devices to your network. However, it can also be a security vulnerability. It’s advisable to disable WPS to minimize the risk of unauthorized access.
- Enable Network Name (SSID) Hiding: By hiding your Wi-Fi network’s SSID, you make it less visible to casual users. Although this won’t deter determined hackers, it adds an extra layer of protection against random attempts to connect to your network.
- Enable MAC Address Filtering: Each device on your Wi-Fi network has a unique MAC address. Enabling MAC address filtering allows you to specify which devices are allowed to connect to your network based on their MAC addresses. While this adds an extra level of security, keep in mind that MAC addresses can be spoofed.
- Regular Firmware Updates: Routinely check for firmware updates provided by your router’s manufacturer. These updates often include security patches and bug fixes that address potential vulnerabilities.
- Guest Network: If your router supports it, create a separate guest network for visitors. This ensures that guests can access the internet without gaining access to your main network and its connected devices.
- Firewall Protection: Enable the built-in firewall on your router. Firewalls act as a barrier between your network and the internet, blocking unauthorized incoming traffic.
- Strong Network Key: Use a strong and unique network name (SSID) and password (Pre-Shared Key) for your Wi-Fi network. Avoid using easily guessable information, such as your name or address, as part of the network name.
- Physical Security: Finally, consider the physical security of your router. Place it in a secure location to prevent unauthorized physical access. Also, consider disabling physical Wi-Fi access buttons on the router itself.
By using these security measures, you significantly reduce the risk of unauthorized access and potential cyber threats to your Wi-Fi network. Keeping your network secure not only protects your data but also ensures that your network operates at its best performance level.
Quality of Service (QoS) Settings
Most modern routers offer Quality of Service settings that allow you to prioritize certain devices or applications, ensuring they receive sufficient bandwidth for smooth operation. By using QoS, you can prevent bandwidth-heavy tasks from hogging all the resources and affecting other devices’ performance.
Use Wi-Fi Heatmapping Tools
This section may be a little too painstaking and scientific for some but it’s good to know these options are available to you.
Wi-Fi heatmapping tools help you identify areas with weak signals and areas of interference in your home. By analyzing the results, you can make informed decisions about router placement and the need for additional Wi-Fi boosters.
Understanding Wi-Fi Heatmapping
Wi-Fi heatmapping tools create visual representations of your Wi-Fi signal’s strength, typically using colors to indicate signal quality. Areas with strong signals are represented by warmer colors (such as red or yellow), while areas with weak signals are indicated by cooler colors (such as blue or green). By analyzing these heat maps, you can pinpoint areas that need improvement and take appropriate action.
Selecting the Right Wi-Fi Heatmapping Tool
There are various Wi-Fi heatmapping tools available, ranging from simple smartphone apps to advanced software designed for professionals. Choose a tool that suits your needs and technical expertise. Some popular options include NetSpot, Ekahau HeatMapper, HeatMapper by Acrylic WiFi, and many more.
Creating a Wi-Fi Signal Map
To begin the process, ensure that you have a floor plan or a rough sketch of your home layout. This map will be the foundation for creating your Wi-Fi signal map. You can either draw the floor plan manually or use specialized apps that allow you to import existing floor plans.
Walking the Space
Now, armed with your Wi-Fi heat mapping tool and your floor plan, it’s time to start mapping the Wi-Fi signal throughout your home. Walk around each room and note down the signal strength at various locations. Some tools might require you to take multiple readings at specific intervals for accurate results.
Analyzing the Results
Once you’ve collected sufficient data, it’s time to analyze the results and generate the heatmap. Load the collected data into the Wi-Fi heat mapping tool and let it work its magic. The tool will process the information and generate a visual representation of your Wi-Fi signal strength.
Identifying Weak Signal Areas
Examine the generated heatmap to identify areas with weak Wi-Fi signals. These areas are likely to experience slow connections, dropped signals, or even Wi-Fi dead zones. Common culprits for weak signal areas include thick walls, large metal objects, and electronic devices that interfere with the signal.Taking Action
With a clear understanding of the weak signal areas, you can now take appropriate action to improve your Wi-Fi coverage. Here are some potential solutions:
a. Router Repositioning:
Based on the heatmap results, consider repositioning your router to a more centralized location. This can help distribute the signal more evenly throughout your home.
b. Use Wi-Fi Extenders or Mesh Systems:
If there are areas that still have weak signals even after router repositioning, consider using Wi-Fi extenders or mesh systems. These devices can amplify and extend your Wi-Fi network’s reach, providing better coverage in hard-to-reach areas.


c. Address Interference:
If the heatmap reveals interference from other devices or neighboring networks, try changing your Wi-Fi channel to a less congested one. Wi-Fi heatmapping tools often suggest optimal channels based on their analysis.
d. Optimize Antenna Positioning:
For routers with external antennas, adjust their positions based on the heatmap results. Experiment with different angles and orientations to maximize signal distribution.
Repeating the Process
Wi-Fi environments can change over time due to various factors, so it’s a good practice to repeat the Wi-Fi heatmapping process periodically. By doing so, you can ensure that your Wi-Fi network remains optimized and continues to provide excellent signal strength throughout your home.
Incorporating Wi-Fi heatmapping tools into your Wi-Fi signal improvement strategy will undoubtedly give you a competitive edge in ensuring a seamless online experience for all your devices.
Upgrading To The Latest Wi-Fi Standards
Keep up with technology by upgrading to the latest Wi-Fi standards, such as 802.11ac or 802.11ax (Wi-Fi 6). These newer standards offer improved speeds, better range, and increased capacity to handle multiple devices simultaneously.
Wi-Fi standards are developed by the Institute of Electrical and Electronics Engineers (IEEE) to define the rules and specifications for wireless networks. Each new Wi-Fi standard aims to address the shortcomings of its predecessors and introduce advancements that cater to the increasing demands of modern connectivity.
Benefits of Upgrading
Upgrading to the latest Wi-Fi standards can bring a host of benefits to your home network:
Faster Speeds
The latest Wi-Fi standards, such as 802.11ac (Wi-Fi 5) and 802.11ax (Wi-Fi 6), offer significantly faster data transfer speeds compared to older standards. This means you can download files, stream videos, and play online games with reduced lag and buffering.
Improved Range
Newer Wi-Fi standards often boast improved range capabilities, allowing Wi-Fi signals to penetrate through walls and reach farther distances. This translates to better coverage throughout your home, even in large or multi-story residences.
Increased Device Capacity
As the number of smart devices in households grows, the demand for a Wi-Fi network that can handle multiple connections simultaneously becomes more pressing. The latest Wi-Fi standards are designed to accommodate a higher number of devices without compromising performance.
Reduced Interference
Wi-Fi 6, in particular, features advanced technologies that help reduce interference from neighboring networks and electronic devices. This leads to a more stable and reliable connection, even in crowded Wi-Fi environments.
Enhanced Security
Newer Wi-Fi standards often come with improved security features, safeguarding your network from potential threats and ensuring that your data remains protected from unauthorized access.
Steps to Upgrade to the Latest Wi-Fi Standards
Upgrading your Wi-Fi network to the latest standards is a straightforward process that requires a few essential steps:
Check Router Compatibility
Begin by checking whether your current router supports the latest Wi-Fi standard. If your router is relatively old, it may not be compatible with Wi-Fi 5 or Wi-Fi 6. In such cases, consider investing in a new router that supports the desired standard.
Purchase a Wi-Fi 5 or Wi-Fi 6 Router
If your current router is not compatible with the latest standards, it’s time to purchase a new one. Look for reputable brands that offer routers with Wi-Fi 5 or Wi-Fi 6 capabilities. Choose a router that suits the size of your home and the number of connected devices.


Update Firmware
Once you have your new Wi-Fi router, it’s essential to update its firmware to the latest version. Router manufacturers often release firmware updates that enhance performance, security, and stability. Regularly updating your router’s firmware ensures you get the best out of your new hardware.
Connect and Configure
Follow the manufacturer’s instructions to connect and configure your new router. Be sure to use strong and unique passwords for your Wi-Fi network and enable the latest encryption protocols, such as WPA3, to ensure maximum security.
Test and Optimize
After setting up your new Wi-Fi network, test its performance using various devices and applications. Measure the speeds and coverage in different areas of your home to ensure that the upgrade has indeed improved your Wi-Fi signal strength and overall performance.
By upgrading to the latest Wi-Fi standards, you future-proof your home network and position yourself at the forefront of modern connectivity. The benefits of faster speeds, improved range, increased capacity, reduced interference, and enhanced security will undoubtedly elevate your online experiences and keep you ahead of the competition.
So, don’t hesitate! Take the leap and upgrade to the latest Wi-Fi standards today to unlock the full potential of your home network.
Properly Position Wi-Fi Antennas
The proper positioning of Wi-Fi antennas is crucial for maximizing signal coverage and ensuring optimal performance of your wireless network. Wi-Fi routers equipped with external antennas offer the flexibility to adjust their orientation, allowing you to fine-tune the signal distribution throughout your home. Here are some essential tips for positioning Wi-Fi antennas effectively:
- Vertical Orientation: For most Wi-Fi routers, positioning the antennas vertically is recommended. This configuration ensures that the signal is evenly distributed in all directions, providing better coverage throughout your home.
- Antenna Angle: Experiment with different antenna angles to find the best orientation. Slight adjustments in the angle can make a noticeable difference in signal strength and reach.
- Pointing Direction: If you have specific areas that require stronger Wi-Fi coverage, consider pointing one or more antennas in that direction. This can help concentrate the signal towards the desired location.
- Diversity Antennas: Some routers come with diversity antennas, which are designed to improve signal reception. In such cases, position the antennas at different angles to take advantage of this feature.
- Clear of Obstacles: Keep the antennas clear of any obstructions, such as walls, furniture, or other electronic devices. Obstacles can hinder the signal and reduce its range.
- Optimal Height: Elevate the router to an optimal height, such as placing it on a shelf or mounting it on a wall. Avoid placing it on the floor, as this can lead to reduced signal coverage.
- Avoid Interference: Identify potential sources of interference, such as cordless phones, microwave ovens, or Bluetooth devices, and position the router away from them to minimize signal disruption.
- Signal Testing: Use Wi-Fi signal strength apps or tools to test the signal at various locations in your home. This will help you determine the best antenna positioning for maximum coverage.
By taking the time to properly position your Wi-Fi antennas, you can ensure that your wireless network delivers reliable and high-speed connectivity to all corners of your home, enhancing your online experiences for work and leisure.
If your router has external antennas, orient them vertically to maximize the signal coverage in all directions. Experiment with different angles and positions to find the optimal setup for your specific home layout.
Conclusion
In conclusion, a strong and reliable Wi-Fi signal is crucial for an enjoyable online experience. By following our comprehensive guide on how to improve Wi-Fi signal strength at home, you can overcome frustrating dead zones and slow connections. Choose the right router, optimize its placement, reduce interference, and keep your network secure to achieve optimal performance. Additionally, utilize Wi-Fi extenders, update firmware regularly, and explore Wi-Fi heatmapping tools for a well-rounded approach to boosting your Wi-Fi signal.
Remember, technology and standards continue to evolve, so stay updated and make the necessary adjustments to ensure you always have the best possible Wi-Fi experience at home.
Last update on 2026-03-12 at 18:06 Affiliate links and Images from Amazon Product Advertising API