TP-Link Router Set-Up: Everything You Need To Know
Whether you’re a tech novice or a seasoned pro, this in-depth article will help you get your TP-Link router set up and running smoothly.
What Makes TP-Link Router Set-Up So Easy?
TP-Link wireless routers have gained a reputation for being exceptionally user-friendly when it comes to setting them up. This ease of installation can be attributed to several design philosophies and features that TP-Link incorporates into their routers.

TP-Link Router Setup – Intuitive User Interface
TP-Link understands that not everyone is a networking expert, and they’ve tailored their user interface accordingly. The web-based setup interface of TP-Link routers is designed with simplicity in mind. The menus are organized logically, and settings are described in plain language, making it easy for users to navigate and configure their routers without feeling overwhelmed by technical jargon.
Guided Setup Wizards
To make the initial TP-Link router set-up process foolproof, TP-Link routers often include guided setup wizards. These wizards take users through each step of the setup process, from language selection to Wi-Fi network configuration. The step-by-step instructions provided by these wizards eliminate guesswork, ensuring that even those with limited technical experience can successfully set up their routers.
Clear Labeling and Port Identification
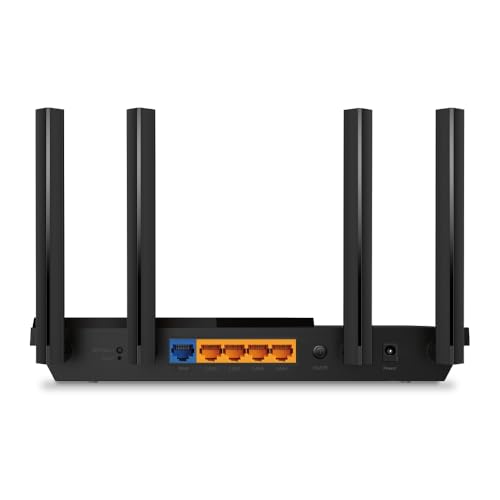
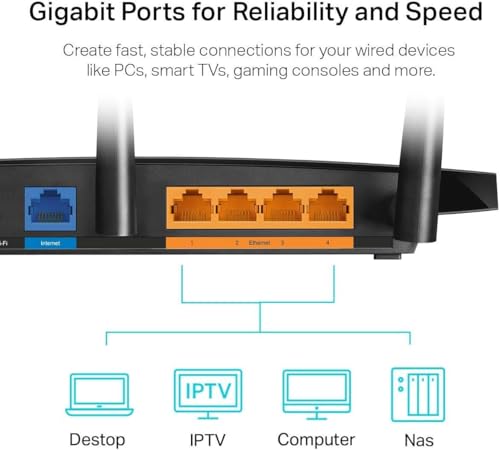
TP-Link router setup is designed with user convenience in mind. Ports and buttons on the router are clearly labeled, making it easy to identify the WAN port, LAN ports, power button, and reset button. This eliminates any confusion during hardware connection, ensuring that users plug cables into the correct ports without frustration.
Quick Start Guides and Documentation
TP-Link includes detailed quick-start guides and documentation with their routers. These guides are concise and easy to follow, providing users with visual aids and step-by-step instructions for setup. Whether you prefer reading a physical guide or referring to an online version, TP-Link ensures that users have the resources they need to set up their routers smoothly.
Remote Management and Mobile Apps
Many TP-Link routers offer remote management capabilities through mobile apps. This means you can set up and configure your router using your smartphone or tablet. The mobile apps provide a simplified interface that’s perfect for users who prefer managing their router settings on the go.
Customer Support
TP-Link takes customer support seriously. If users encounter any issues during setup, they can rely on TP-Link’s customer support resources, including online guides, forums, and live chat. The availability of prompt and helpful support ensures that users can overcome any challenges they might face during the setup process.
In conclusion, TP-Link routers are easy to set up due to a combination of factors: an intuitive user interface, guided setup wizards, clear labeling, comprehensive documentation, mobile app accessibility, and reliable customer support. These features collectively create a seamless setup experience that caters to both beginners and experienced users, making TP-Link routers an excellent choice for hassle-free networking.

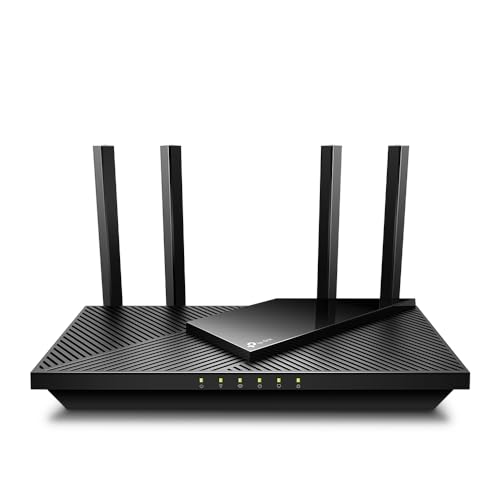
TP-Link AX5400 WiFi 6 Router (Archer AX73)- Dual Band Gigabit Wireless Internet...


TP-Link Router Set-Up – Gathering Your Equipment
Before you dive into the setup process, let’s ensure you have everything you need. You’ll require the TP-Link router, an Ethernet cable, a modem, and a computer or smartphone. Having these essentials on hand will save you time and frustration later.
Choosing a Suitable Location
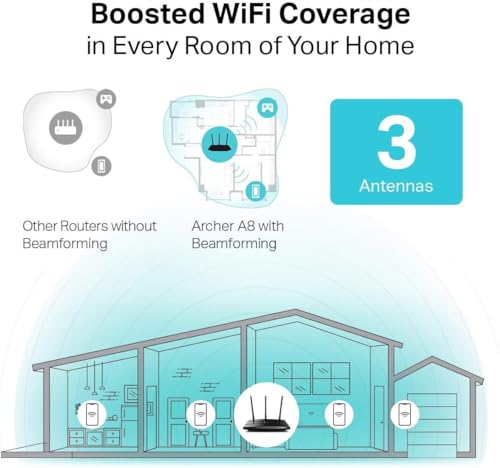
Your router’s placement plays a pivotal role in its performance. Ideally, position it in a central location, elevated and away from walls and obstructions. This ensures a strong signal reach throughout your space, avoiding dead zones.
TP-Link Router Set-Up – Connecting the Hardware
Let’s get physical! Connect the modem to the WAN port on your router using an Ethernet cable. Plug the router into a power outlet and turn it on. The lights on the router should start blinking – a good sign that things are coming to life.
Unboxing and Preparation
Begin by unboxing your TP-Link router and familiarizing yourself with its components. You’ll find the router itself, an Ethernet cable, a power adapter, and possibly additional accessories. Having everything within reach ensures a smooth and uninterrupted setup process.
Modem Connection
Your TP-Link router acts as a bridge between your devices and the internet, and the first link in this chain is your modem. Connect one end of the Ethernet cable to the modem’s Ethernet port and the other end to the router’s WAN (Wide Area Network) port. This establishes the communication pathway between your internet source and the router.
Powering Up
Once the Ethernet cable is securely connected, plug the router’s power adapter into a nearby electrical outlet. Power on the router by pressing the power button if applicable, or simply connecting it to the power source. The router’s lights will come to life, indicating that it’s receiving power and initializing its internal processes.
Status Indicators
Observe the lights on the router carefully. These status indicators provide valuable insights into the router’s operational state. Commonly, there are lights for power, internet connectivity, Wi-Fi activity, and LAN (Local Area Network) ports. A steady and consistent pattern of lights indicates that the hardware is functioning correctly.
Wi-Fi Configuration
While your initial TP-Link router set-up might be done via a wired connection, this is also a good time to configure your Wi-Fi network settings. Access the router’s web interface using a web browser and follow the prompts to set up your Wi-Fi network name (SSID) and password. This ensures that your wireless devices can seamlessly connect once the hardware setup is complete.
 – 802.11ax Router, 4 Gigabit LAN Ports, Dual Band AX Router,Beamforming,OFDMA, MU-MIMO, Parental Controls, Works with Alexa")
Positioning Considerations
During this hardware connection process, take a moment to consider the physical placement of your router. Position it in a central location to ensure even coverage throughout your living or office space. Avoid placing it near obstacles like walls, large furniture, or electronic devices that could interfere with the signal.
Troubleshooting Connection Issues
If you encounter any issues during this step, double-check your cable connections and power supply. Ensure the Ethernet cable is securely plugged into both the modem and the router. If you’re still facing connectivity challenges, refer to the router’s documentation or online resources for troubleshooting guidance.
By connecting the hardware components of your TP-Link router with precision and care, you establish the backbone of your network. This foundation sets the stage for the subsequent configuration steps that will allow you to fully unleash the potential of your TP-Link router, providing reliable internet access to all your devices.
With the initial steps of hardware connection in place, you’re on the path to a successful TP-Link router setup. Let’s continue the process to ensure a smooth and hassle-free experience as you move forward.
Internet Status Check
After you’ve connected the hardware, take a moment to check the router’s internet status indicator. This light typically blinks or glows steadily when the router establishes a connection with the internet through the modem. If the light indicates a problem, verify your modem’s connectivity and consider restarting both the modem and router.
Firmware and Software Updates
While the router’s hardware is now connected, it’s a good idea to check for firmware updates. Manufacturers frequently release updates that improve security, fix bugs, and enhance performance. Visit the TP-Link website or use the router’s web interface to check for any available updates and follow the instructions to install them.
Securing the Hardware Setup
Once your TP-Link router is up and running, consider securing the physical setup. Neatly organize the cables and cords to prevent tripping hazards and to maintain an organized workspace. If you’re concerned about tampering, place the router in a location that is less accessible to unauthorized individuals.
Network Testing
Before proceeding further, test the network connection. Connect a computer or device to the router’s Wi-Fi network and check if you have internet access. If you experience any issues, double-check your Wi-Fi settings, including the SSID and password, and make sure your device is connected to the correct network.
Moving Forward
With the hardware connection established, you’re now ready to proceed with the next steps of the setup process. Access the router’s web-based interface by typing its IP address into your web browser. This interface will allow you to configure various settings, set up your wireless network, and optimize your router’s performance according to your preferences.
Additional Accessories and Peripherals
Depending on your specific needs, you might want to connect additional accessories to your router. TP-Link routers often feature USB ports for connecting external storage devices or printers, expanding the capabilities of your network.
Documentation and Quick Guides
Keep the router’s quick start guide and documentation handy. These resources can be invaluable if you encounter any issues or if you need to refer back to specific setup steps in the future.
Celebrate Your Progress
Completing the hardware connection step is a significant achievement on your path to a fully operational network. Take a moment to acknowledge your progress and the effort you’ve invested in ensuring a solid foundation for your TP-Link router setup.
TP-Link AX1800 WiFi 6 Router (Archer AX21) – Dual Band Wireless Internet...


Accessing the Router’s Interface
By connecting the hardware components with care and attention to detail, you’ve set the stage for a reliable and efficient network experience. Your TP-Link router is now primed to provide seamless connectivity, and you’re well on your way to enjoying a fast and secure internet connection for all your devices.
Once you’ve physically connected your TP-Link router, the next step in the setup process involves accessing the router’s web-based interface. This interface serves as your virtual control center, allowing you to configure settings, customize your network, and ensure optimal performance. Let’s explore how to access this interface and make the most of its capabilities.
Now, open your preferred web browser and enter the router’s IP address (usually something like 192.168.0.1) into the address bar. This will take you to the TP-Link router’s web-based interface.
Web Browser Entry
To access the router’s interface, open a web browser on your computer or smartphone. In the address bar, type the router’s default IP address. This address is usually “192.168.0.1” or “192.168.1.1”, but you can find it in the router’s documentation or on the router itself. Press “Enter” to proceed.
Login Credentials
Upon entering the IP address, you’ll be directed to a login page. Here, you’ll need to enter your login credentials. Typically, the default username is “admin,” and the default password is also “admin.” However, for security reasons, it’s advisable to change these credentials once you gain access to the interface.
User-Friendly Interface
Once you’ve successfully logged in, you’ll be greeted by the router’s interface. TP-Link takes pride in designing interfaces that are user-friendly and intuitive. The menus and options are organized logically, making it easy for users of all technical levels to navigate through the settings.
Dashboard Overview
The dashboard or home page of the interface often provides an overview of key information, such as internet status, connected devices, and Wi-Fi settings. This snapshot gives you a quick glance at the state of your network, allowing you to identify any issues that might require attention.
Navigation and Menus
The interface is typically organized into sections or menus that correspond to different settings and configurations. These menus might include Wireless Settings, Security, Network Setup, Advanced Settings, and more. Clicking on each menu will take you deeper into the interface, where you can adjust specific parameters.
Customizing Your Network
From the interface, you can customize various aspects of your network. You can change your Wi-Fi network name (SSID), set up guest networks, configure security protocols, manage connected devices, and optimize performance using Quality of Service (QoS) settings.
Firmware Updates and Support
The interface is also where you can check for firmware updates. Manufacturers regularly release updates to improve security and enhance features. Additionally, you can find links to support resources, online documentation, and user guides within the interface.
Logout and Security
After you’ve configured the necessary settings, it’s important to log out of the interface to prevent unauthorized access. This is especially crucial if you’re using a shared computer or public network.
Exploring Further
As you become more comfortable with the interface, you might delve into advanced settings and configurations. Just remember that making changes to certain settings can impact your network’s performance, so proceed with caution and refer to the documentation if needed.
By accessing the router’s interface, you gain the power to tailor your network according to your preferences. This control center empowers you to manage and optimize your TP-Link router, ensuring that you get the most out of your internet connection and network setup.

TP-Link AC1750 Smart WiFi Router (Archer A7) -Dual Band Gigabit Wireless Internet...
Initial Setup Wizard
The initial setup wizard will be your trusty guide here. It will walk you through language selection, time zone settings, and more. Remember to jot down your login credentials – these will be your golden ticket to the router’s settings in the future.
Language and Region Selection
Upon accessing your router’s web interface, the Initial Setup Wizard is often the first thing you’ll encounter. It begins by offering you a choice of languages and regions. By selecting your preferred language and region, the wizard tailors the setup process to align with your specific location and preferences.
Time Zone Configuration
Setting the correct time zone is vital for accurate time-based features and scheduling. The wizard will prompt you to select your time zone from a list of available options. This step ensures that your network’s timing is synchronized with your local area.
Internet Connection Type
Next, the wizard will guide you through selecting your internet connection type. This step is crucial as it determines how your router will interact with your internet service provider’s network. You might need to choose from options like Dynamic IP, PPPoE, or Static IP, based on your internet subscription.
Wi-Fi Network Setup
One of the key aspects of the initial setup is configuring your Wi-Fi network. The wizard will prompt you to enter a unique name for your network, known as the SSID (Service Set Identifier). Additionally, you’ll set a secure password to ensure that only authorized users can connect to your network.
Admin Password Creation
As a security measure, the Initial Setup Wizard will guide you through creating an administrator password. This password is crucial for accessing your router’s settings in the future. It’s recommended to choose a strong password that combines letters, numbers, and symbols for enhanced security.
Completing the Wizard
After you’ve provided the necessary information and made the appropriate selections, the wizard will summarize your choices. This is your opportunity to review the settings you’ve configured before finalizing them. Once you confirm, the wizard will apply the settings, and your TP-Link router will be ready to use.
Benefits of the Wizard
The Initial Setup Wizard is particularly beneficial for individuals who are new to networking. It eliminates the need for extensive technical knowledge and guides users through each step in a clear and concise manner. By providing prompts and explanations along the way, the wizard ensures that you have a solid foundation for your network.
Post-Wizard Customization
Although the Initial Setup Wizard streamlines the process, you’re not limited to its selections. Once your router is up and running, you can access the web interface to make additional customizations, explore advanced settings, and optimize your network according to your preferences.
By making the initial setup process straightforward and user-friendly, TP-Link’s Initial Setup Wizard allows you to confidently navigate the essential steps of configuring your router. This wizard is a valuable tool that empowers you to establish a secure and functional network without the need for extensive technical expertise.

TP-Link Smart WiFi 6 Router (Archer AX10) – 802.11ax Router, 4 Gigabit...


Setting Up Your Wireless Network
Configuring your TP-Link router’s wireless network is a pivotal step in ensuring that your devices can seamlessly connect to the internet. This process involves customizing your network’s name, known as the SSID (Service Set Identifier), and establishing a secure password. By setting up your wireless network thoughtfully, you create a welcoming gateway to the online world while prioritizing security.
Naming Your Network (SSID)
When setting up your wireless network, the first decision to make is to name it. This name, known as the SSID, is what devices will see when searching for available Wi-Fi networks. Choose a name that is unique but recognizable, avoiding any personal information that could be used to identify you.
Security with a Strong Password
Security is paramount when it comes to your wireless network. Create a strong, complex password that combines uppercase and lowercase letters, numbers, and symbols. This password is your first line of defense against unauthorized access to your network. Avoid using common passwords or easily guessable combinations.
Encryption for Data Protection
Select the encryption protocol for your network. WPA3 is the most advanced encryption standard, providing robust security for your network traffic. This encryption ensures that the data transmitted between your devices and the router remains confidential and protected from eavesdropping.
Benefits of Guest Networks
Many TP-Link routers offer the option to set up guest networks. This feature is especially useful when you have visitors who need internet access but shouldn’t have access to your main network. Guest networks are isolated from your main network and often come with their own password. They offer a secure way to share connectivity without compromising your privacy.
Balancing Convenience and Security
While creating a strong password and encryption are essential, also consider the convenience of your network settings. Striking a balance between security and ease of use is key. Remember that complex passwords are more secure, but you should also choose a password that you can easily remember or store securely.
Managing Devices
As you set up your wireless network, you’ll have the opportunity to manage the devices connected to it. Some routers allow you to prioritize specific devices, ensuring they receive the best possible network performance. This is particularly useful for activities like online gaming or streaming, where a stable connection is crucial.
Periodic Password Changes
While you’re configuring your wireless network, consider the practice of changing your password periodically. Regular password changes can provide an added layer of security, reducing the risk of unauthorized access even if someone manages to obtain your password.
Sharing with Caution
If you choose to share your network password with others, do so selectively and with caution. Only provide your password to individuals you trust, as giving out your password can potentially expose your network to security risks.
Setting up your TP-Link router’s wireless network is about more than just connecting devices to the internet. It’s about creating a secure and comfortable digital environment for your devices and ensuring that your online activities remain private. By following these steps and making thoughtful choices, you can establish a wireless network that meets your connectivity needs while prioritizing the security of your data.
Security Settings
Stay one step ahead of potential threats by enabling WPA3 encryption. This beefs up your network’s security significantly. Plus, consider setting up a guest network for visitors – keeping your main network and devices safe.
Encryption Standards
Start by selecting the appropriate encryption standard for your network. WPA3 is the latest and most secure option, providing strong encryption for your data. It’s recommended to opt for WPA3 over older standards like WPA2 or WEP, as these have known vulnerabilities that could compromise your network’s security.
Strong Wi-Fi Password
Craft a robust Wi-Fi password that combines a mix of upper and lower case letters, numbers, and symbols. A strong password makes it significantly harder for malicious actors to gain unauthorized access to your network. Avoid using easily guessable passwords or common phrases.
Change Default Credentials
Most routers come with default login credentials, such as “admin” for both the username and password. Change these default credentials immediately. Using strong and unique credentials minimizes the risk of unauthorized access to your router’s settings.
Firewall Protection
Enable the router’s built-in firewall to add an additional layer of protection. Firewalls monitor and control incoming and outgoing network traffic, helping to prevent unauthorized access and thwart potential threats.
Remote Management
Disabling remote management is a wise security choice. Remote management allows you to access your router’s settings from outside your network, but it also presents a potential vulnerability. By disabling this feature, you limit access to your router’s configuration to devices within your home network.
Network Isolation and Guest Networks
If your TP-Link router supports guest networks, use this feature to create a separate network for guests. Guest networks are isolated from your main network, preventing unauthorized users from accessing your private files and devices.
MAC Address Filtering
MAC address filtering allows you to specify which devices are allowed to connect to your network based on their unique MAC addresses. While this method adds an extra layer of security, keep in mind that it’s not foolproof, as MAC addresses can be spoofed.
Regular Firmware Updates
Firmware updates provide critical security patches that protect your router from known vulnerabilities. Regularly check for and install firmware updates to ensure your router is up to date and equipped to fend off potential threats.
Periodic Security Audits
Conduct security audits on your router settings periodically. Review your security settings, connected devices, and access logs to identify any irregularities or unauthorized access attempts.
Educate Network Users
If you have multiple users on your network, educate them about the importance of security practices. Encourage them to use strong passwords, avoid sharing sensitive information over the network, and be cautious when clicking on unfamiliar links.
By configuring robust security settings, you’re not only protecting your network but also safeguarding your personal information and online activities. These settings create a strong defense against potential cyber threats, ensuring that your TP-Link router is a secure gateway to the digital world.

TP-Link AC1900 Smart WiFi Router (Archer A8) - High Speed MU-MIMO Wireless...


Advanced Settings
Venture into the advanced settings cautiously. Port forwarding is handy for gaming, while DHCP and DNS settings can optimize your network. Familiarize yourself with these options before diving in.
While the basic setup of your TP-Link router ensures connectivity, delving into advanced settings opens up a world of customization and optimization. These settings allow you to fine-tune your router’s performance, prioritize specific activities, and tailor your network to suit your preferences. Let’s delve into the realm of advanced settings to understand how they can elevate your networking experience.
Quality of Service (QoS)
QoS settings enable you to prioritize certain types of internet traffic over others. This is particularly useful in households or offices with multiple devices vying for bandwidth. You can allocate more resources to activities like streaming or online gaming, ensuring a smoother experience even when the network is busy.
Port Forwarding
Port forwarding allows you to route internet traffic from specific ports to specific devices on your network. This is essential for hosting services or playing certain online games that require open ports for communication. By configuring port forwarding, you ensure that the necessary data reaches the intended destination.
Dynamic DNS (DDNS)
If you have a dynamic IP address (one that changes periodically), DDNS helps you assign a domain name to your router’s IP address. This makes it easier to access your network remotely, even if your IP address changes. DDNS is especially useful for remote access to security cameras or home automation systems.
Parental Controls
Advanced settings often include robust parental control features. These allow you to manage internet access for specific devices or users. You can set time limits, block certain websites, and even schedule internet access, ensuring a safe online environment for children and teenagers.
Virtual Private Network (VPN) Configuration
If you use a VPN for enhanced privacy and security, your TP-Link router might offer VPN configuration options. This allows you to set up a VPN connection at the router level, ensuring that all devices connected to the router benefit from the VPN’s encryption and anonymity.
MAC Address Cloning
Some internet service providers lock their service to a specific MAC address (the unique identifier of your network adapter). If you replace your router, you might need to clone the MAC address of your old router to ensure uninterrupted internet service.
DNS Settings
You can configure your router to use specific DNS servers instead of the default ones provided by your ISP. This can potentially improve internet speed and security. Google’s Public DNS and Cloudflare DNS are popular alternatives.
Guest Network Customization
While we’ve mentioned guest networks earlier, advanced settings allow for greater customization. You can tweak bandwidth limits, control access times, and even customize login pages for guest users.
Wireless Channel Selection
Advanced settings often grant you control over wireless channel selection. By choosing the right channel, you can minimize interference from neighboring networks and optimize your wireless signal’s performance.
IPv6 Configuration
As the internet transitions to IPv6, advanced routers offer options to configure IPv6 settings. IPv6 provides more IP addresses and improved security features compared to the older IPv4.
Exploring advanced settings empowers you to extract the fullest potential from your TP-Link router. These settings allow you to tailor your network to your needs, ensuring optimal performance, enhanced security, and a customized user experience. While venturing into advanced settings might require some technical knowledge, the rewards in terms of improved networking capabilities are well worth the effort.
Firmware Updates
Think of firmware updates as your router’s wardrobe refresh. They bring enhanced performance and security. Regularly check for updates in the router’s settings and install them – it’s like giving your router a digital spa day.
Improved Performance
Firmware updates often include performance optimizations. These updates fine-tune the router’s internal processes, enhancing its efficiency and responsiveness. You might notice improved Wi-Fi speeds, smoother data transmission, and quicker response times after installing a firmware update.
Bug Fixes
Software bugs can occasionally crop up in any technological device, including routers. Firmware updates address these bugs, resolving issues that might affect your router’s stability, speed, or functionality. By keeping your firmware up to date, you ensure that any identified bugs are promptly corrected.
Security Enhancements
Cyber threats are a reality of the digital age. Firmware updates play a critical role in maintaining your network’s security. Manufacturers regularly release updates that patch vulnerabilities and protect against emerging threats. These updates fortify your router’s defenses, safeguarding your data and privacy.
Compatibility with New Devices
As technology evolves, new devices are introduced to the market. Firmware updates ensure that your router remains compatible with the latest devices, protocols, and standards. This compatibility ensures seamless communication between your router and a wide range of devices.
New Features and Functionality
Firmware updates can bring exciting new features and functionalities to your router. These additions might include improved user interfaces, enhanced network management options, and integrations with emerging technologies. Regularly updating your firmware ensures you have access to the latest features.
How to Update Firmware
Updating your TP-Link router’s firmware is a straightforward process. Visit the manufacturer’s website and locate the support section for your router model. Download the latest firmware version and follow the provided instructions to apply the update. Some routers even offer an option to update the firmware directly from the router’s web interface.
Caution and Backup
While firmware updates are crucial, exercise caution during the process. Ensure that you’re downloading the update from an official source, such as the manufacturer’s website. Additionally, it’s a good practice to back up your router’s settings before updating the firmware. This ensures you can revert to your previous configuration if any issues arise.
Regularity of Updates
Manufacturers release firmware updates periodically. It’s advisable to check for updates every few months or whenever you notice a dip in your network’s performance. Some routers even offer the option to enable automatic firmware updates, ensuring that your router remains up to date without manual intervention.
In conclusion, firmware updates are essential for maintaining the health, security, and performance of your TP-Link router. By staying vigilant and proactive about updating your router’s firmware, you ensure that your networking experience remains optimized, secure, and aligned with the latest technological advancements.
Quality of Service (QoS) Configuration
Make sure your devices get the bandwidth they deserve by setting up QoS. You can prioritize activities like streaming or gaming, ensuring lag-free experiences. It’s a VIP treatment for your internet traffic.
Quality of Service (QoS) configuration is a powerful tool that allows you to prioritize specific types of internet traffic, ensuring that critical activities receive the bandwidth they deserve. Let’s explore the world of QoS and how it can elevate your network performance.
Bandwidth Allocation
QoS configuration enables you to allocate bandwidth to different types of internet traffic. By setting priorities, you ensure that essential activities, such as streaming, online gaming, or video conferencing, receive a higher share of the available bandwidth.
Preventing Congestion
In a busy network with multiple devices, congestion can occur, leading to slower internet speeds. QoS prevents congestion by ensuring that data flows smoothly and without interruption to devices engaged in real-time activities.
Prioritizing Activities
QoS allows you to prioritize certain activities over others. For example, you can give online gaming or video conferencing the highest priority, ensuring low latency and minimal lag. This is particularly beneficial for activities where responsiveness is critical.
Customized Profiles
TP-Link routers often come with pre-configured QoS profiles that cater to various types of activities, such as gaming, streaming, or browsing. These profiles offer a quick way to optimize your network for specific uses, but you can also create custom profiles to suit your preferences.
Bandwidth Limitation
QoS can also be used to limit the bandwidth allocated to certain activities. This can prevent any single device or application from consuming the entire network’s resources, ensuring fair usage across all devices.
Configuration Steps
Configuring QoS involves a few key steps. Access your router’s web interface and navigate to the QoS settings. From there, you can enable QoS and prioritize different types of traffic based on applications, devices, or IP addresses.
Testing and Adjusting
After configuring QoS, it’s a good practice to test and fine-tune your settings. Monitor network performance during different activities to ensure that the allocated bandwidth matches your desired priorities. If necessary, make adjustments to optimize the distribution of bandwidth.
Real-Time Monitoring
Some TP-Link routers offer real-time monitoring of network activity. This allows you to observe how QoS is impacting your network and make immediate adjustments if certain activities are not receiving the expected priority.
Balancing Needs
While QoS enhances performance, it’s important to strike a balance. Prioritizing one activity too heavily could impact others. Consider the needs of all users and devices on the network to create a balanced QoS configuration.
Flexibility and Evolution
As your network usage patterns change, your QoS configuration might need adjustments. The flexibility of QoS settings allows you to adapt to new devices, applications, and user preferences over time.
In conclusion, QoS configuration empowers you to optimize your TP-Link router’s performance to match your specific needs. By ensuring that critical activities receive the necessary bandwidth, you create an efficient and responsive network that can handle a variety of tasks without compromise. QoS is a tool that allows you to take control of your network’s performance, ensuring a seamless and enjoyable online experience for all users.
Troubleshooting Common Issues
Did your connection hit a bump? Before you dial tech support, try these DIY fixes: reboot your router, check cable connections, or update firmware. Often, the solution is simpler than you think.

Parental Controls
Parental controls aren’t just for parents. They let you manage internet access and content for specific devices. Set up filters and time limits – it’s like having a digital nanny.
Parental controls, a feature offered by many TP-Link routers, empower you to manage and monitor internet access for your children. Let’s delve into the significance of parental controls and how they enable you to create a nurturing online environment.
Internet Safety for Children
Parental controls are a proactive measure to protect children from inappropriate content, cyberbullying, and online predators. With these controls in place, you can filter out harmful websites and content that might be unsuitable for young eyes.
Time Management
Parental controls allow you to set time limits for internet usage. This feature helps prevent excessive screen time and encourages a healthy balance between online and offline activities. You can establish specific time windows during which the internet is accessible, promoting quality family time and other activities.
Age-Appropriate Access
Different age groups have varying internet needs. Parental controls allow you to tailor internet access based on age-appropriate guidelines. You can grant more access and freedom to older children while maintaining stricter controls for younger ones.
Content Filtering
Parental controls enable you to filter content based on categories, keywords, or specific websites. This feature prevents access to explicit or objectionable content, ensuring that your children browse the internet in a secure and positive environment.
Safe Search Enforcement
Search engines sometimes display content that might not be suitable for children, even when searching innocent terms. Parental controls can enforce safe search settings, ensuring that search results are filtered for inappropriate content.
 - High Speed MU-MIMO Wireless Router, Dual Band Router for Wireless Internet, Gigabit, Supports Guest WiFi, Beamforming, Smart Connect (Renewed)")
Monitoring and Reporting
Many parental control systems offer monitoring and reporting capabilities. You can view reports detailing your children’s online activities, the websites they visit, and the time they spend online. This visibility allows for informed conversations about responsible internet usage.
Guest Network Controls
If your TP-Link router supports guest networks, parental controls can extend to these networks as well. This feature ensures that visiting friends or relatives also abide by your family’s online guidelines.
Communication Supervision
With parental controls, you can manage communication platforms, including social media and messaging apps. This prevents unwanted interactions and protects your children from potential online threats.
Educating Responsible Internet Use
Parental controls aren’t just about restriction; they’re also about education. By setting boundaries and explaining the reasons behind them, you empower your children to develop responsible online habits that will serve them well throughout their lives.
Configurability and Flexibility
Parental control settings are customizable and adaptable. As your children grow, their online needs might change. Parental controls allow you to adjust settings and restrictions accordingly, ensuring that your approach evolves with their maturity.
By leveraging parental controls on your TP-Link router, you create a digital environment that nurtures your children’s growth, creativity, and exploration while keeping them safe from potential online hazards. These controls empower you to guide your family’s online experiences and foster a balanced, secure, and responsible relationship with technology.
Router Maintenance
Like any device, your router needs some TLC. Regularly check for dust and debris buildup, and ensure good airflow. A clean router is a happy router.
Conclusion
Congratulations! You’ve successfully transformed into a TP-Link router setup expert. By following these steps, you’ve established a strong, secure, and reliable network that will keep you connected without a hitch. Remember, a well-set router is the backbone of your digital world.
FAQs
1. Can I change my Wi-Fi network’s name later? Absolutely! You can revisit your router’s settings and modify your network’s name whenever you want.
2. What if I forget my router’s login credentials? No worries. Most routers have a reset button that restores default settings. Just remember to reconfigure your settings afterward.
3. How often should I update my router’s firmware? Check for updates every few months. Manufacturers release firmware updates to address security vulnerabilities and improve performance.
4. Can I set up parental controls on specific devices? Indeed, you can. TP-Link routers often allow you to assign controls on a per-device basis, giving you granular control.
5. What’s the benefit of a guest network? A guest network lets visitors access the internet without gaining access to your private devices and files, ensuring your network’s security remains intact.